DIY Headboard Alternatives: Unconventional Options for Your Bedroom
When it comes to bedroom decor, the headboard is a key element that not only provides practical support for pillows but also adds a touch of style to your personal sanctuary. However, traditional headboards can be pricey and might not align with your unique design vision.
That's where DIY headboard alternatives come in, offering an opportunity to infuse your bedroom with your own creativity and personality. Whether it's upcycling old doors, crafting a lush botanical backdrop, or experimenting with textile art, these unconventional options allow you to make your bedroom a canvas for self-expression.
Not only does this save you money, but it also turns your bedroom into a place that truly reflects your individuality and the love you put into crafting it. So, unleash your inner artist, embrace sustainability, and embark on a creative adventure to transform your sleeping space into something uniquely and beautifully yours. Sweet dreams and happy crafting!
Why Consider DIY Headboard Alternatives?
When considering unconventional headboard ideas, it's essential to delve deeper into the compelling advantages of choosing DIY alternatives over traditional options.
Cost-Effective Solutions
Traditional headboards can often come with a hefty price tag. DIY alternatives offer a cost-effective approach to achieving a stylish bedroom aesthetic without straining your budget. Crafting your headboard allows you to significantly reduce costs associated with both materials and labor, making it a wallet-friendly choice. This financial freedom can be especially appealing for those looking to spruce up their bedroom without breaking the bank.
Personalization and Individuality
Crafting your headboard provides a unique opportunity for self-expression and personalization. When you create your diy headboard alternatives, you have the freedom to select materials, colors, and designs that align with your unique style and personality. This level of customization results in a one-of-a-kind bedroom focal point that reflects your individual taste and preferences. Your bedroom becomes a true reflection of your character and creativity.
Eco-Friendly Practices
Embracing DIY headboard projects can contribute to a more eco-friendly lifestyle. By repurposing and upcycling materials for your diy headboard alternatives, you actively reduce waste and minimize your carbon footprint.
This environmentally conscious approach allows you to make a positive impact by creatively reusing existing items in new and sustainable ways. It's a small but meaningful step towards a more sustainable future.
Sense of Achievement
The satisfaction derived from completing a DIY project is unparalleled. Witnessing your handmade diy headboard alternatives as part of your daily life brings a profound sense of accomplishment. Knowing that you crafted a piece of furniture that not only enhances your bedroom's aesthetics but also aligns with your values and creativity is truly priceless. It's a tangible reminder of your abilities and the joy of creating something beautiful and functional with your own hands.
Shutter Chic: Reclaimed Shutters as Headboards
If you're looking to infuse a touch of rustic elegance into your bedroom while staying true to your DIY spirit, consider utilizing reclaimed wooden shutters as an unconventional yet charming headboard. This creative project not only adds character to your sleeping space but also contributes to sustainable decor by repurposing old materials. Here's a comprehensive guide on how to transform reclaimed shutters into a chic and personalized diy headboard alternatives:
Materials Needed
- Old wooden shutters
- Paint or stain
- Screws
- Screwdriver
- Sandpaper
- Measuring tape
Step-by-Step Guide
- Find the Perfect Shutters: Begin your headboard adventure by scouring thrift stores, salvage yards, or exploring online marketplaces. Seek out old wooden shutters that align with your desired size and aesthetic. Keep an eye out for shutters that resonate with your bedroom's overall style.
- Prep and Paint: Prepare your chosen shutters for their new role as a headboard. Start by sanding them to remove any rough edges or old paint. This step not only enhances the appearance but also ensures safety. Next, unleash your creative flair by painting or staining the shutters to match your bedroom decor. Whether you opt for a bold and vibrant hue or a soothing neutral tone, the choice is yours, and it's an opportunity to personalize your space.
- Mount the Shutters: Measure the width of your bed and determine the desired height for your headboard. Mark these measurements on the wall to ensure proper alignment. Using screws and a screwdriver, securely attach the shutters horizontally to the wall. Take extra care to ensure they are firmly fastened, as this will be the focal point of your bedroom.
- Finishing Touches: Elevate the charm of your shutter diy headboard alternatives by adding creative finishing touches. Consider incorporating decorative elements such as knobs, hooks, or even delicate fairy lights. These additions not only enhance the visual appeal but also provide functional benefits by serving as a spot for hanging accessories or creating a cozy atmosphere with soft lighting.
Explore our latest post on DIY Bed Canopy with Lights
Book Lovers' Dream: Floating Bookshelf Headboard
For avid readers and bibliophiles, there's a remarkable DIY headboard alternative that not only adds a touch of intellectual charm to your bedroom but also provides functional storage for your cherished literary treasures. The floating bookshelf diy headboard alternatives combines the love for books with a creative bedroom design. Here's a detailed guide on how to transform floating shelves into a captivating and personalized headboard:
Materials Needed
- Floating shelves
- Books
- Screws
- Screwdriver
- Level
- Measuring tape
Step-by-Step Guide
- Choose the Shelves: Start your bookshelf headboard project by selecting the right floating shelves. Opt for shelves that match the width of your bed, ensuring they complement the room's overall dimensions. You can even experiment with shelves of varying lengths to create an eye-catching and dynamic appearance.
- Mount the Shelves: Measure the height at which you want to position your floating shelves on the wall. Use a level to guarantee that they are perfectly straight. Secure the shelves to the wall using screws and a screwdriver. This step ensures the stability and safety of your bookshelf headboard.
- Arrange Your Books: Now, it's time to unleash your creativity and arrange your favorite books on the shelves. Organize them in a way that not only serves as a diy headboard alternatives but also showcases your literary preferences and interests. You can arrange them by size, color, or even stack them creatively to add visual interest to your bedroom.
- Add Personal Touches: To infuse a personal touch into your bookshelf headboard, consider incorporating small decorative items alongside your beloved books. Framed photos, artwork, or decorative trinkets can provide a balanced and aesthetically pleasing composition. These additions enhance the headboard's appeal while reflecting your unique personality and style.
Nature's Haven: Branch and Driftwood Headboard
If you're seeking a headboard that seamlessly integrates the beauty of nature into your bedroom decor, a DIY branch and driftwood diy headboard alternatives is the perfect choice. This headboard not only adds an organic and rustic charm to your sleeping space but also allows you to repurpose natural elements found during your outdoor adventures. Here's a comprehensive guide on how to craft your very own Nature's Haven headboard:
Materials Needed
- Branches or driftwood pieces
- Twine or rope
- Screws
- Screwdriver
- Saw
- Measuring tape
Step-by-Step Guide
- Collect Natural Elements: Begin your project by embarking on a nature-inspired scavenger hunt. Search for branches or driftwood pieces during a leisurely stroll through the woods or along the beach. When gathering these elements, aim for a variety of sizes and shapes to achieve an organic and visually appealing design.
- Prepare the Branches: Once you've collected your natural treasures, assess whether any branches or driftwood pieces need to be trimmed to fit your vision. Use a saw to carefully cut them to your desired lengths. Additionally, sand any rough edges to ensure they are safe and splinter-free.
- Lay Out Your Design: Before mounting the branches on the wall, take time to arrange them on the floor. Experiment with different layouts to create a headboard design that resonates with your aesthetic preferences. Once you're satisfied with the arrangement, begin tying the branches together using twine or rope. This step not only enhances stability but also adds an element of rustic beauty.
- Mount Your Creation: Measure the height of your bed and mark the corresponding height on the wall. Position your branch and driftwood arrangement at this level and secure it to the wall using screws and a screwdriver. Ensure that it is firmly fastened to ensure safety and stability.
- Enhance with Lights: To infuse a touch of enchantment into your Nature's Haven diy headboard alternatives, consider adding string lights or fairy lights around the branches. This subtle illumination creates a cozy and magical atmosphere in your bedroom, making it an ideal setting for relaxation and rest.
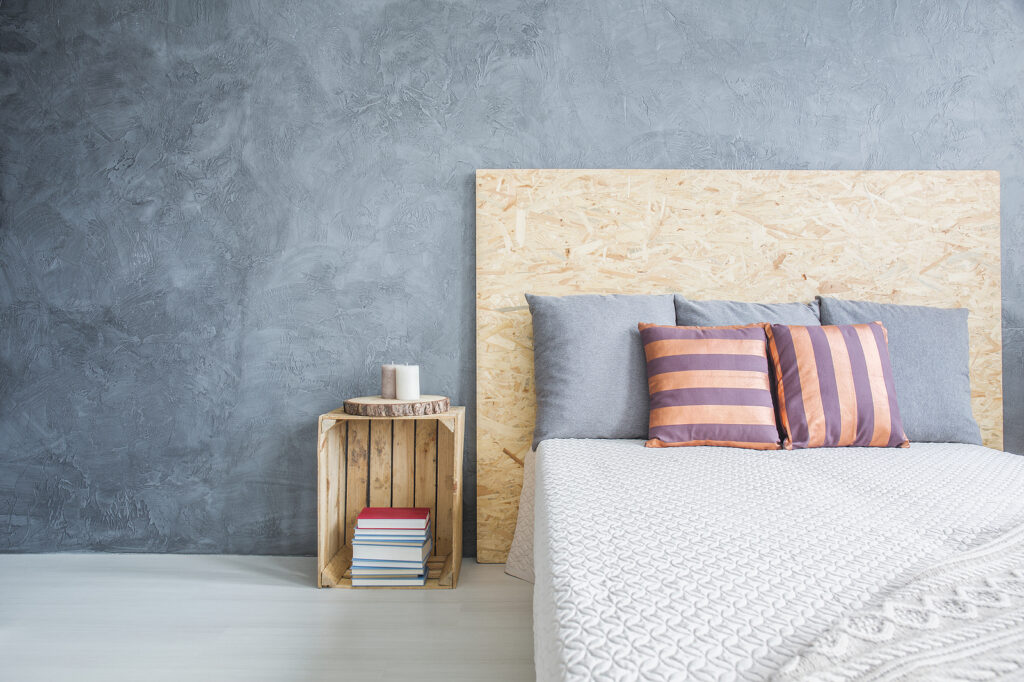
Quilted Comfort: Upholstered Headboard Alternatives
If you're aiming to create a plush and inviting atmosphere in your bedroom, consider crafting an upholstered headboard. This DIY project not only adds a sense of comfort but also offers a wide range of design possibilities. Here's a comprehensive guide on how to create your very own Quilted Comfort headboard:
Materials Needed
- Plywood
- Foam padding
- Fabric
- Staple gun
- Batting
- Screws
- Screwdriver
- Measuring tape
Step-by-Step Guide
- Create the Base: Begin by cutting a piece of plywood to your desired headboard width and height. To ensure safety and a polished finish, sand any rough edges on the plywood.
- Add Padding: To infuse a layer of plushness into your diy headboard alternatives, attach foam padding to the plywood. This can be accomplished using adhesive or a staple gun. Ensure that the padding is evenly distributed and covers the entire surface of the plywood, creating a comfortable and supportive foundation adventurous route with twigs.
- Wrap in Fabric: Select your preferred fabric, taking into account its color, pattern, and texture. Lay the fabric flat on a clean surface, place the plywood and foam on top of it, and proceed to wrap the fabric tightly around the headboard. Secure the fabric at the back using a staple gun, taking care to achieve a smooth and wrinkle-free surface.
- Attach Batting: For an extra layer of softness and to enhance the quilted appearance, add batting between the fabric and the foam. Secure the batting in place with staples, ensuring that it remains smooth and uniform across the doors headboard diy.
- Mount to the Wall: Determine the desired height for your upholstered headboard and mark the corresponding position on the wall. Securely attach the headboard to the wall using screws and a screwdriver. Make sure it is firmly fastened to guarantee stability and safety the bed.
Mirror, Mirror: Mirrored Headboard Alternatives
If you're looking to infuse glamour, light, and a touch of sophistication into your bedroom, a mirrored headboard is the perfect choice. This reflective and stylish DIY project not only creates a visually striking focal point but also adds depth and dimension to your sleeping space. Here's a comprehensive guide on how to create your very own Mirrored distressed wood panel headboard:
Materials Needed
- Framed mirrors
- Adhesive or mirror clips
- Screws
- Screwdriver
- Measuring tape
Step-by-Step Guide
- Choose Your Mirrors: Begin by selecting framed mirrors that complement your bedroom's style and ambiance. You have the flexibility to choose identical mirrors for a cohesive look or mix and match different sizes and shapes to craft a truly unique and eclectic headboard.
- Arrange Your Design: Lay out the chosen mirrors on the floor to experiment with various arrangements. This step allows you to create a visually appealing and harmonious design. Play with different configurations until you find the perfect layout that resonates with your aesthetic preferences.
- Mount the Mirrors: Measure the desired height for your mirrored headboard and mark the wall accordingly. Depending on your mirror's weight and size, you can choose between adhesive or mirror clips to securely attach them to the wall. Be sure to follow the manufacturer's instructions for your chosen mounting method to ensure the mirrors are firmly fastened and safe.
- Add Decorative Elements: To elevate the overall aesthetic of your mirrored headboard, consider incorporating decorative elements that complement its elegant allure. Wall decals, vinyl lettering, or LED strip lighting can be strategically placed around the mirrors to enhance their visual impact. These additions contribute to the diy headboard alternatives ambiance and can create a captivating and enchanting atmosphere in your bedroom.
Explore our latest post on DIY King Size Headboard
Artistic Flair: DIY Canvas Headboard Alternatives
If you're yearning to infuse your bedroom with creativity and personal expression, consider crafting your own DIY canvas headboard. This imaginative and customizable project allows you to transform your sleeping space into a unique work of art. Here's a comprehensive guide on how to create your very own Artistic Flair headboard:
Materials Needed
- Canvas or fabric panels
- Wooden dowels
- Screws
- Screwdriver
- Paint or fabric markers
- Measuring tape
Step-by-Step Guide
- Select Your Canvas: Start your creative journey by selecting canvas panels or fabric that harmonizes with your bedroom's color scheme and style. You have the option to purchase pre-made canvas panels in various sizes or unleash your creativity by crafting your own using wooden dowels and fabric. The choice is yours, and it sets the foundation for your artistic diy headboard alternatives.
- Create Your Design: Let your artistic talents flourish as you paint or decorate the canvas panels with fabric markers. This step offers a platform for you to express yourself fully. You can opt for abstract designs, incorporate your favorite quotes, or even replicate famous artworks that resonate with you. This creative process transforms your diy headboard alternatives into a unique and personalized masterpiece.
- Attach the Panels: Measure the desired height for your canvas headboard and mark the wall accordingly. Secure the canvas panels to the wall using screws and a screwdriver. Ensure that the panels are evenly spaced and firmly fastened to the wall, providing a stable and secure backdrop for your creative expression.
- Personalize Further: To enhance the functionality and aesthetics of your canvas headboard, consider adding small shelves or hooks. These additional features provide a platform to display artwork, photographs, or decorative items that further reflect your personality and style. This level of personalization makes your headboard not only an artistic focal point but also a functional and interactive element in your bedroom decor.
Conclusion
Crafting a DIY headboard is more than just a budget-friendly home decor project; it's a deeply personal and rewarding journey. As someone who has ventured into the world of unconventional unusual headboards show creativity ideas, I can attest to the sense of fulfillment that arises from transforming a simple bedroom into a canvas of self-expression. These DIY alternatives allow you to infuse your sleeping space with your unique personality and values, making it truly your own.
Whether you choose to upcycle, create, or repurpose, each headboard becomes a work of art, a reflection of your creativity, and a symbol of your commitment to sustainable living. These projects have shown me that every piece of furniture in my bedroom can tell a story, and my story is embedded in every carefully chosen material, every stroke of paint, and every innovative design choice that adorns my bedroom headboard alternatives.
As I drift off to sleep each night, surrounded by the fruits of my creative endeavors, I'm reminded that home is where the heart is, and mine is woven into every thread of my personalized headboard. So, as you embark on your journey of DIY headboard creation, may it be as fulfilling and transformative for you as it has been for me. Sweet dreams and happy crafting!
Sources
https://www.apartmenttherapy.com/11-ideas-for-how-to-frame-a-bed-without-a-headboard-249486