DIY Test for Mold
Dealing with mold has been a real challenge for me as a homeowner, and I've come to realize just how important it is to stay on top of it for the sake of my family's health. Fortunately, I've discovered a DIY method to test for mold in my home, which has brought me some peace of mind. In this guide, I'll share the steps I've learned to safely and effectively detect mold in my own living space using this DIY mold test.
Understanding Mold
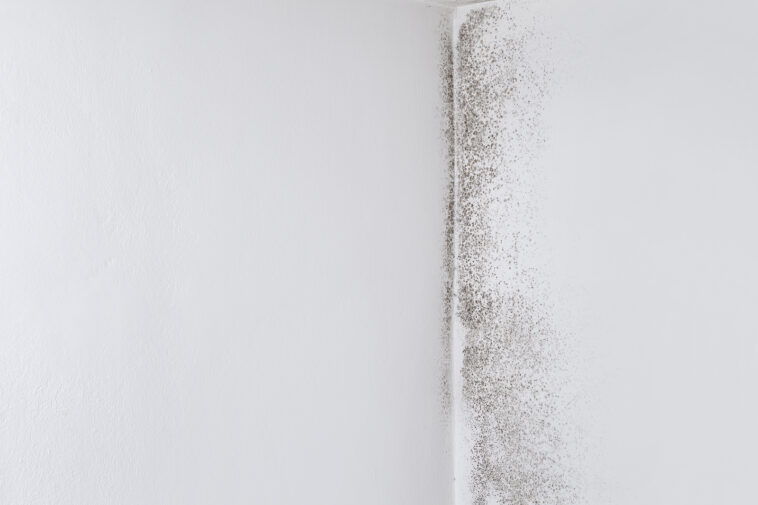
Before embarking on a do-it-yourself mold test, it is crucial to have a comprehensive grasp of the intricacies of mold. Mold, an insidious organism, belongs to the fungal kingdom and has a remarkable ability to flourish in conditions characterized by excessive moisture and humidity.
This resilient organism's lifecycle involves the production and dissemination of microscopic spores, which possess the remarkable capability to become airborne and subsequently find their way to different nooks and crannies within your household environment.
Mold's adaptability and resilience make it a formidable adversary for homeowners, and comprehending its fundamental nature is the first step in effectively managing and mitigating its presence in your living spaces healthful home minute mold test.
Health Risks Associated with Mold
It is vital to recognize that mold presents substantial health risks to both you and your family. Exposure to mold spores can lead to a range of health problems, including:
Respiratory Issues
Mold spores possess the capacity to irritate the respiratory system, potentially causing a host of symptoms that include persistent coughing, frequent sneezing, and throat irritation. Prolonged exposure may exacerbate these symptoms, leading to more severe respiratory complications.
Allergic Reactions
Mold is a known allergen that can provoke allergic responses in individuals with heightened sensitivity. Allergic reactions to mold may manifest as itching, inflammation, redness of the eyes, and skin rashes, which can significantly impact the quality of life for those affected.
Asthma Aggravation
For individuals already coping with asthma, exposure to mold can prove particularly problematic. Mold's presence can exacerbate asthma symptoms, making it more challenging to manage the condition effectively. Wheezing, increased shortness of breath, and heightened bronchial sensitivity are common consequences of mold exposure for asthma sufferers.
Infections
In some cases, mold exposure can be especially perilous for individuals with compromised immune systems. Mold can potentially lead to fungal infections, which can be life-threatening in severe cases.
Therefore, those with weakened immune defenses, such as individuals undergoing chemotherapy or organ transplant recipients, should exercise extreme caution in mold-prone environments shipping to the lab.
Why DIY Mold Testing is Important
Recognizing the importance of early mold detection is paramount in safeguarding both your living environment and the health of those residing in it. Mold, when left unchecked, can proliferate rapidly and pose substantial health risks. While professional mold inspections are certainly an option, they often come with a hefty price tag. Here's why DIY mold testing is a valuable and cost-effective alternative for homeowners:
- Timely Detection: The earlier mold is detected, the easier it is to contain and mitigate. DIY mold testing allows you to identify potential mold issues promptly, preventing them from escalating into more extensive and expensive problems.
- Cost-Effective: Professional mold inspections can be expensive, involving fees for inspection, sampling, and laboratory analysis. DIY mold testing kits are readily available at a fraction of the cost, making it an economical choice for homeowners looking to maintain a mold-free environment.
- Accessibility: DIY mold testing kits are accessible and user-friendly. They are designed for homeowners with varying levels of expertise, enabling anyone to conduct basic mold assessments without the need for specialized training or equipment.
- Peace of Mind: Regular DIY mold testing provides homeowners with peace of mind, knowing that their living spaces are free from mold-related threats. This proactive approach to mold management can lead to a healthier and more comfortable living environment.
- Preventative Action: DIY mold testing empowers homeowners to take preventative action. When mold is detected early, you can address the issue promptly, preventing further damage to your property and minimizing potential health risks for you and your family.
Preparing for the DIY Mold Test
Preparing for a DIY mold test involves several important steps to ensure accurate results and a comprehensive assessment of your home's mold situation. Here's what you should do before initiating the test:
Select the Test Locations
Begin by strategically identifying the areas within your home where mold is more likely to thrive. These typically include spaces with higher humidity levels or previous water damage. Common areas for testing encompass bathrooms, basements, kitchens, and any regions with a history of leaks or flooding. Thoroughly inspect these locations for any visible signs of mold growth.
Compile the Essential Materials
Gather the necessary materials for conducting the DIY mold test. To guarantee precision and reliability, it's crucial to have the right tools at your disposal. The forthcoming section will provide an in-depth breakdown of the requisite materials, ensuring you're well-prepared for the testing process.
Materials Needed for the DIY Mold Test
Conducting a successful DIY mold test necessitates the acquisition of specific materials that enable accurate and informed assessments of mold presence within your home. Here's a detailed list of the materials you'll require:
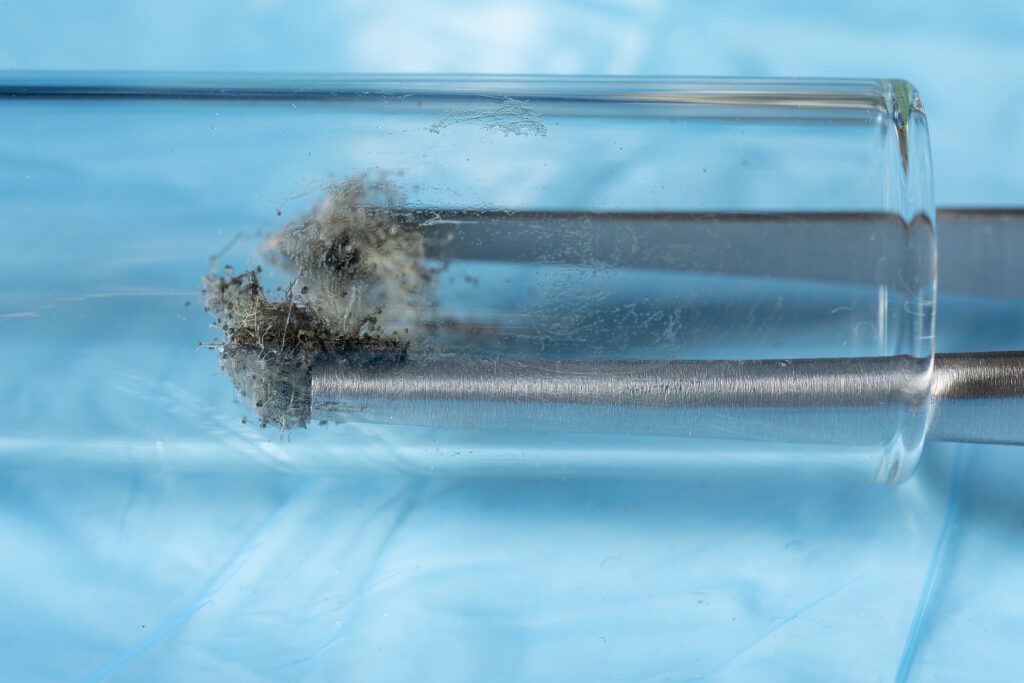
Mold Test Kit
Procure a reliable mold test kit from a reputable manufacturer. These kits typically include essential components such as petri dishes or swab samplers, agar (a growth medium for mold), and comprehensive instructions for proper utilization.
Safety Gear
Ensure your safety by donning appropriate protective gear, including sturdy gloves, a respiratory mask, and protective goggles. These items shield you from potential exposure to mold spores during the testing process.
Flashlight
A dependable flashlight is indispensable for inspecting concealed or poorly lit areas where mold may lurk. It illuminates spaces that may otherwise go unnoticed.
Plastic Bags
Prepare plastic bags to securely seal the petri dishes or swab samplers after sampling. This precaution prevents cross-contamination and ensures the integrity of your samples.
Labels and Marker
Employ labels and a marker to clearly identify each sample and record essential details, including the location of the sample and the date of testing. Precise labeling is instrumental in organizing and interpreting your results accurately.
Tape
You might require tape to seal the Petri dishes or swab samplers after you've collected your mold samples. This step preserves the samples and prevents accidental exposure to mold spores.
Notebook and Pen
Keep a dedicated notebook and pen within reach to meticulously document your observations and results throughout the testing process. Maintaining a record allows for thorough analysis and comparison of findings.
Step-by-Step Guide to Conducting the DIY Mold Test
Executing a DIY mold test is a methodical process that ensures accuracy in assessing potential mold infestations within your living environment. Follow these comprehensive steps to conduct a successful DIY mold test:
Step 1: Prepare the Test Area
Begin by selecting the specific area you intend to test for mold. Ensure that this area is dry, as mold thrives in damp conditions. It's essential that the chosen location is not wet due to recent cleaning activities or leaks.
Additionally, take measures to isolate the test area by closing all windows and doors to prevent outside air from contaminating your sample.
Step 2: Wear Safety Gear
Prioritize your safety by equipping yourself with the appropriate protective gear. This includes wearing durable gloves, a respiratory mask, and protective goggles to minimize the risk of mold exposure during the testing process.
Step 3: Set Up the Mold Test Kit
Open the mold test kit and meticulously review the provided instructions. Different kits may have distinct procedures, so it's vital to understand the specific requirements of your kit.
Position the petri dishes or swab samplers in the areas you've chosen to test. Follow the time specifications detailed in the kit's instructions for the duration you should leave them exposed to the environment.
Step 4: Seal the Samples
Once the designated exposure period has elapsed, take care to seal the petri dishes or swab samplers securely. This can be accomplished using tape or any materials provided within the kit itself.
Step 5: Label and Record
To maintain clarity and ensure proper tracking of your samples, label each one with essential information, including the date it was obtained and the precise location from which it was collected.
Simultaneously, maintain a dedicated notebook and pen within easy reach to record any observations or potential indicators of mold growth during the testing process.
Step 6: Wait for the Results
Store the sealed samples in a secure location in accordance with the instructions provided in your kit. Bear in mind that mold growth may not become visible immediately and may take several days to manifest.
Interpreting the Results
Once you've patiently allowed your mold samples to incubate for the prescribed duration, it's time to interpret the results. A careful evaluation of the samples is crucial to determine whether mold is present in your home. Here's how to interpret the findings:
Examine for Mold Growth
Inspect the petri dishes or swab samplers for any signs of mold growth. Mold typically manifests as fuzzy or discolored patches on the surface of the sampling medium.
Recognize the Presence of Mold
If you observe the telltale signs of mold growth, such as the appearance of fuzzy or discolored spots, it is a clear indication that mold is present in the tested area of your home. This discovery underscores the importance of early detection and serves as a critical starting point for addressing the issue.
Consider Further Action
The presence of mold in your DIY test indicates that your home may require remediation and mold management measures. Depending on the extent and type of mold identified, you may need to consult with professionals for thorough mold removal and addressing the underlying moisture or humidity issues contributing to mold growth.
Take Preventative Measures
Even if your DIY test does not reveal mold growth, it's essential to remain vigilant. Mold spores can be present in the air and may not always be visible. Continue to monitor and address conditions that promote mold growth, such as leaks, excess humidity, or poor ventilation, to prevent future issues.
Next Steps After Detecting Mold
Upon discovering mold in your DIY test, it's essential to proceed with a well-informed and strategic approach. Here are the recommended steps to take:
Identify the Type of Mold
While DIY tests can confirm the presence of mold, they typically cannot discern the specific type of mold. If you have concerns about the presence of toxic molds, consider consulting a professional mold inspector or laboratory for a more comprehensive analysis. Identifying the mold species is crucial as certain molds can pose more significant health risks than others.
Address the Issue Promptly
Once you've confirmed the presence of mold, it is imperative to take immediate action to mitigate the problem. This may involve several steps, including:
- Isolation: Isolate the affected area to prevent the spread of mold spores to other parts of your home.
- Cleaning: Safely clean and remove visible mold using appropriate cleaning agents and following recommended safety guidelines.
- Repairing Leaks: Identify and address the source of moisture or water intrusion that allowed the mold to thrive. Repair any leaks or plumbing issues promptly.
- Improving Ventilation: Enhance ventilation and reduce humidity levels in the affected area to discourage future mold growth.
Consult a Professional
In cases where the mold problem is extensive, or you suspect the presence of toxic molds, it's advisable to seek the expertise of a professional mold remediation service. Professional mold remediation experts have the knowledge, experience, and equipment to effectively address severe mold infestations and ensure comprehensive removal. Additionally, they can help you identify and rectify underlying moisture issues that may have contributed to mold growth.
Preventing Mold Growth
Preventing mold issues is often more straightforward and cost-effective than dealing with mold remediation. Here are essential tips to help you ward off mold growth within your home:
- Control Moisture: Moisture control is paramount in preventing mold. Address any leaks, whether from roofs, plumbing, or foundations, promptly and thoroughly. Regularly inspect your home for water intrusion points, and apply adequate waterproofing measures to prevent moisture from seeping in.
- Enhance Ventilation: Improve ventilation in areas prone to dampness, such as bathrooms, kitchens, and basements. Proper ventilation helps reduce humidity levels and discourages mold growth. Consider installing exhaust fans or opening windows when cooking, showering, or doing laundry.
- Monitor Indoor Humidity: Invest in a dehumidifier to maintain indoor humidity levels consistently below 50%. Lower humidity reduces the likelihood of mold thriving in your home.
- Regular Cleaning and Maintenance: Regularly clean and maintain areas that are susceptible to mold, like bathrooms and basements. Keep these spaces dry and free of excess moisture. Use mold-resistant paints and materials in areas prone to dampness.
- Outdoor Maintenance: Ensure proper drainage around your home's foundation to prevent water from accumulating near the walls. Trim trees and bushes away from your home to reduce shade and promote air circulation, which can inhibit mold growth.
- Routine Inspections: Conduct routine inspections of your home to catch and address mold-prone conditions early. This includes checking for signs of water damage, like stained ceilings or walls, and addressing them promptly.
- Monitor and Maintain HVAC Systems: Ensure that your heating, ventilation, and air conditioning (HVAC) systems are well-maintained. Regularly change filters, clean ducts, and have the system inspected to prevent mold from proliferating within your ductwork.
FAQs
Q1: What are the health risks associated with mold exposure?
A1: Mold exposure can lead to a range of health problems, including respiratory issues like coughing and sneezing, allergic reactions, aggravation of asthma symptoms, and even fungal infections in individuals with compromised immune systems.
Q2: Why is DIY mold testing important for homeowners?
A2: DIY mold testing is important because it allows homeowners to detect mold issues early, which can prevent them from becoming more extensive and costly to remediate. It's a cost-effective and accessible way to maintain a mold-free living environment.
Q3: What materials are needed for a DIY mold test?
A3: The materials needed for a DIY mold test include a mold test kit, safety gear (gloves, respiratory mask, protective goggles), a flashlight, plastic bags, labels and a marker, tape, a notebook, and a pen.
Q4: What are the steps involved in conducting a DIY mold test?
A4: The steps for conducting a DIY mold test include selecting the test locations, wearing safety gear, setting up the mold test kit, sealing the samples, labeling and recording details, waiting for the results, and interpreting the findings.
Q5: What should homeowners do if mold is detected in a DIY test?
A5: If mold is detected in a DIY test, homeowners should identify the type of mold (consider consulting a professional for this), address the issue promptly by isolating the affected area, cleaning and removing visible mold, repairing leaks, and improving ventilation. In severe cases, consulting a professional mold remediation service may be necessary.
Q6: How can homeowners prevent mold growth in their homes?
A6: To prevent mold growth, homeowners should control moisture by addressing leaks, enhancing ventilation in damp areas, monitoring indoor humidity levels, engaging in regular cleaning and maintenance, maintaining outdoor drainage, conducting routine inspections, and ensuring HVAC systems are well-maintained.
Q7: What are the benefits of DIY mold testing compared to professional inspections?
A7: DIY mold testing is cost-effective, provides timely detection, is accessible to homeowners, and offers peace of mind. However, professional inspections may be necessary for severe mold issues or identifying specific types of mold.
Conclusion
As a homeowner, my journey with mold has taught me invaluable lessons about the importance of vigilance and proactive measures in safeguarding my family's well-being and the integrity of our home. Through DIY to test for black mold testing, I've not only saved money but also gained peace of mind, knowing that I can detect and address mold issues early.
The process has become an integral part of my home maintenance routine, reinforcing the connection between a healthy living environment and my family's health. Whether it's the empowerment that comes with early detection or the willingness to seek professional help when needed, I've come to appreciate the pivotal role I play in ensuring a safe, mold-free home for my loved ones.