Spring Crafts for Adults
With winter behind us and the promise of longer days and warmer weather ahead, it's no surprise that many of us are itching to embrace the vibrant energy of spring. One of the best ways to celebrate this transformative season is by diving into some creative projects.
If you're an adult looking for a refreshing way to welcome spring, you're in the right place. In this guide, we'll explore some of the most delightful and invigorating spring crafts for adults that you can try out. Let’s bring a splash of color and freshness into our homes and lives!
Why Spring Crafts Matter
Therapeutic Benefits for Mental Health
Engaging in spring crafts is more than just a hobby; it's a powerful tool for enhancing your mental well-being. Crafting has been scientifically proven to reduce anxiety, alleviate stress, and combat depression. This creative activity provides a therapeutic escape from the daily pressures of life, enabling individuals to immerse themselves in the present moment and find solace in the creative process.
A Gateway to Unleash Creativity
Spring symbolizes renewal and rejuvenation, making it the perfect season to awaken your inner artist. Participating in spring crafts for adults offers a unique opportunity to tap into your creative potential. Whether you're painting, sculpting, or crafting with various materials, you can explore new artistic mediums and unleash your imagination, resulting in a heightened sense of self-expression and personal fulfillment.
Economical Home Décor Transformation
Spring crafts aren't just about personal well-being; they also have practical advantages. Handmade crafts have the ability to breathe new life into your living space without breaking the bank. By indulging in spring crafts, you can create one-of-a-kind home decor items that infuse your surroundings with a fresh, seasonal vibe. This cost-effective approach allows you to revitalize your home's ambiance, making it a reflection of your unique style and creativity.
Spring Craft Ideas for Adults
Now, let's delve into some delightful spring craft ideas that are perfect for adults.
Floral Wreath Making
Materials Required
- Grapevine wreath base: Choose a wreath base made from grapevines, as they provide a natural and rustic look that complements the spring theme.
- Assorted silk or dried flowers: Gather an assortment of silk or dried flowers in various colors and types. Consider incorporating seasonal blooms like tulips, daffodils, and daisies for an authentic spring feel.
- Floral wire: To securely attach the flowers to the wreath base, you'll need floral wire. This ensures your wreath remains intact and enduring.
- Ribbon: Select a beautiful ribbon that complements your chosen flower colors and adds a touch of elegance to your wreath.
- Hot glue gun: A hot glue gun is handy for attaching flowers and ribbon securely to the wreath base, providing extra stability.
Step-by-Step Instructions
- Prepare Your Workspace: Set up a crafting area with all your materials within reach. Ensure you have a clean and spacious surface to work on.
- Design Your Floral Arrangement: Before attaching anything to the wreath base, lay out your flowers and experiment with different arrangements. Mixing flowers of various colors, sizes, and textures will result in a visually captivating wreath. Consider creating clusters of flowers rather than spreading them evenly for added depth and dimension.
- Secure Flowers with Floral Wire: Once you've decided on your arrangement, begin attaching the flowers to the grapevine wreath base. Use floral wire to wrap around the stems of each flower and then twist it around the base. This method provides a secure hold and prevents the flowers from falling off.
- Utilize the Hot Glue Gun: For extra reinforcement and stability, apply a small amount of hot glue to the base of each flower before securing it with floral wire. This dual attachment method ensures the flowers stay in place.
- Add a Decorative Ribbon: To finish your wreath, tie a decorative ribbon around the top or create a bow to hang at the bottom. The ribbon not only serves a practical purpose but also adds a charming touch to your creation.
- Hang Your Wreath: Find the perfect spot to display your handmade masterpiece. Hang it on your front door to welcome guests into your home, on a wall to add a delightful spring accent, or even use it as a centerpiece for special occasions.
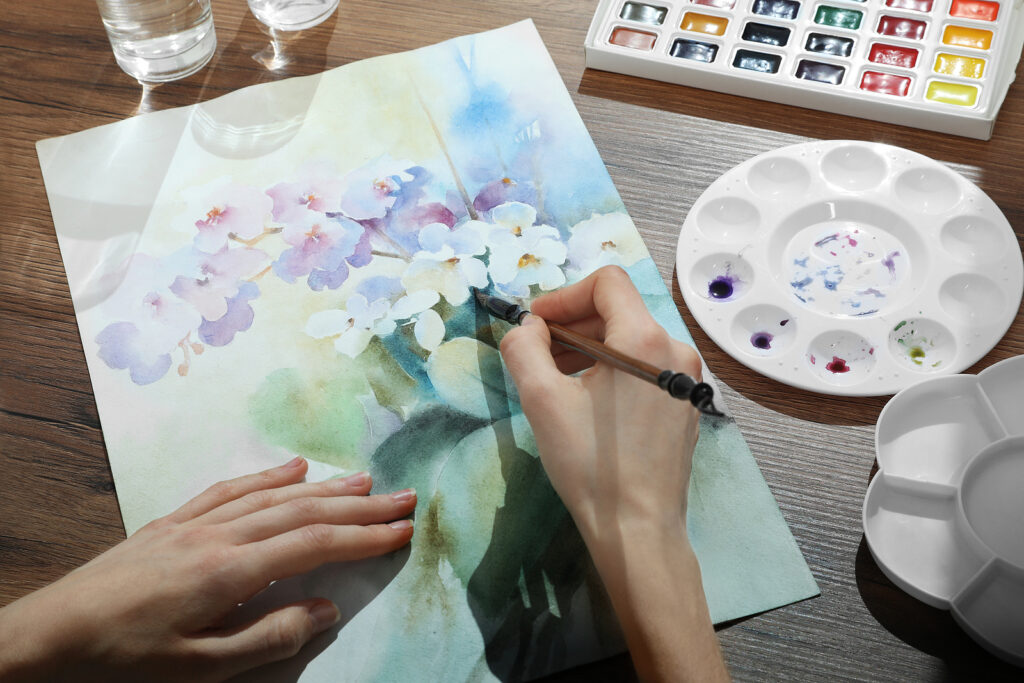
Spring-inspired Watercolor Paintings
Materials Required
- Watercolor Paper: Begin with high-quality watercolor paper to ensure your artwork stands the test of time. Watercolor paper is designed to handle the moisture of the paints without warping.
- Watercolor Paints: Gather a palette of watercolor paints. Opt for a wide range of colors, including vibrant spring shades like pastel pinks, fresh greens, and sunny yellows.
- Brushes: Select a variety of brushes with different shapes and sizes. Brushes with fine tips are ideal for intricate details, while broader brushes work well for creating broader strokes and washes.
- Water: Keep a container of clean water nearby to dilute and mix your paints as needed. A water spray bottle can also be handy for creating unique watercolor effects.
Step-by-Step Instructions
- Inspiration and Sketching: Before diving into your painting, gather inspiration from the spring season. Think about the natural beauty of blooming flowers, budding trees, fluttering butterflies, or any other spring-related imagery that appeals to you. You can sketch your chosen subject lightly on the watercolor paper with a pencil as a guide, or simply paint freely.
- Color Selection: Choose the colors that best capture the essence of spring. You might want to blend soft pastels for a gentle, dreamy look, or opt for bold, bright hues for a more vibrant representation of the season.
- Techniques and Texture: As you begin painting, experiment with various watercolor techniques to achieve different textures and effects. Try “wet-on-wet” for blending colors seamlessly or “dry brushing” for creating texture and details. Layering colors and allowing them to interact on the paper can result in captivating and unpredictable outcomes.
- Details and Highlights: Pay attention to the finer details in your artwork. Use fine brushes for delicate lines and highlights to add depth and dimension to your spring-inspired scene.
- Drying and Framing: Allow your watercolor paintings to dry completely. Once they're dry, you can choose to frame them for a more formal presentation or use them as greeting cards to share the beauty of spring with friends and family.
Decorative Mason Jar Vases
Materials Required
- Mason Jars: Begin with a collection of clear mason jars in various sizes to add depth and variety to your decor.
- Acrylic Paint: Gather a selection of acrylic paint in a palette of pastel spring colors. You can also opt for paint with different finishes, such as matte or glossy, to create diverse visual effects.
- Paintbrushes: Ensure you have a range of paintbrushes, including fine detail brushes for intricate designs and larger brushes for broad strokes.
- Twine or Ribbon: To enhance the rustic charm of your mason jar vases, select twine or ribbon in complementary colors and textures.
- Fresh or Silk Flowers: Depending on your preference and availability, gather fresh-cut spring flowers or high-quality silk blooms to fill your vases.
Step-by-Step Instructions
- Design Your Vases: Let your creativity flow as you decide on the design for your mason jar vases. You can paint them in soft pastel hues that evoke the essence of spring, or you can take it a step further by crafting intricate floral designs. Consider using stencils or freehand painting, depending on your skill level and desired outcome.
- Painting Technique: Experiment with different painting techniques to achieve a variety of looks. Layer colors for depth, create gradients for a seamless transition of colors, or even add decorative patterns like polka dots or stripes to add character to your vases.
- Drying Time: Allow the painted mason jars to dry completely. Depending on the thickness of your paint layers, this may take several hours to overnight. Patience here ensures that your designs remain vibrant and long-lasting.
- Twine or Ribbon Accents: To enhance the aesthetic appeal of your vases, tie twine or ribbon around the neck of each jar. This simple addition adds a touch of rustic elegance that perfectly complements the spring theme.
- Floral Arrangements: Now comes the fun part—filling your decorative mason jar vases with beautiful blooms. If you've chosen fresh flowers, trim their stems to the appropriate length and arrange them in the jars. Alternatively, silk flowers can be artfully arranged and secured in place.
- Display with Style: Place your adorned mason jar vases throughout your home to create stunning springtime centerpieces. They can brighten up your dining table, windowsills, mantel, or any space that could use a touch of seasonal charm.
Birdhouse Painting and Decoration
Materials Required
- Unpainted Wooden Birdhouses: Begin with unpainted wooden birdhouses as your blank canvas. These can be readily found at craft stores or online, and their natural wood finish provides an excellent surface for painting and decorating.
- Acrylic Paints: Gather an assortment of acrylic paints in a vibrant palette of spring colors. These paints are not only easy to work with but also provide a durable finish that can withstand outdoor conditions.
- Paintbrushes: Ensure you have a variety of paintbrushes at your disposal, including fine-tipped brushes for intricate details and larger brushes for covering larger surfaces.
- Outdoor Varnish (Optional): If you intend to place your decorated birdhouses outdoors, it's advisable to protect your artwork with outdoor varnish. This clear protective coating will shield your paintwork from the elements, ensuring longevity.
- Decorative Accents: For a truly unique touch, gather decorative accents such as small faux birds, twigs, miniature flowers, or any other embellishments that reflect the natural beauty of spring.
Step-by-Step Instructions
- Design Your Birdhouses: Begin by envisioning your birdhouses' designs. Spring themes can include vibrant florals, cheerful patterns, or even whimsical scenes that celebrate the season's essence. Sketch your ideas lightly on the wooden birdhouses with a pencil as a guide, or let your creativity flow freely.
- Colorful Painting: Use your selected acrylic paints to bring your designs to life. Experiment with different techniques such as layering, blending, and shading to create depth and visual interest. Consider incorporating seasonal motifs like blooming flowers, chirping birds, or fluttering butterflies to capture the spirit of spring.
- Allow Paint to Dry: Patience is key. Allow your painted birdhouses to dry completely. Depending on the thickness of your paint layers, this may take several hours or overnight to ensure the colors remain vibrant.
- Outdoor Varnish (Optional): If you plan to place your birdhouses outdoors, protect your artwork by applying a coat of outdoor varnish. Follow the manufacturer's instructions for proper application and drying times. This step will help preserve your designs and prevent weather-related damage.
- Decorative Accents: Add those charming finishing touches to your birdhouses. Attach small faux birds, miniature flowers, or twigs to complement your spring-inspired themes. These accents not only enhance the visual appeal but also create an inviting atmosphere for feathered friends.
- Hang and Enjoy: Once your decorated birdhouses are complete and dry, find suitable locations in your garden or on your porch to hang them. Position them strategically to attract birds, providing a welcoming sanctuary for your winged neighbors.
Embroidered Spring Hoop Art
Materials Required
- Embroidery Hoop: Begin with an embroidery hoop, which serves as the foundation for your artwork. You can choose from various sizes to suit your design preferences.
- Fabric: Select a piece of fabric that complements your spring theme. Fabrics with a tight weave, such as cotton or linen, work well for embroidery, providing a sturdy surface for your stitches.
- Embroidery Floss: Gather an array of embroidery floss in a spectrum of spring-inspired colors. These vibrant threads will bring your designs to life with depth and vibrancy.
- Embroidery Needles: Ensure you have a selection of embroidery needles, each suitable for different stitches and thread thicknesses. Having a variety of needle sizes allows for greater versatility in your embroidery work.
- Embroidery Patterns or Freehand Designs: Decide whether you'd like to work from existing embroidery patterns or create your own freehand designs. Spring themes might include blossoming flowers, chirping birds, or intricate floral patterns.
Step-by-Step Instructions
- Prepare Your Fabric: Place your chosen fabric in the embroidery hoop. Ensure the fabric is taut and evenly stretched within the hoop. Tightening the hoop's screw mechanism secures the fabric in place.
- Design Your Embroidery: Before you start stitching, either trace a pre-existing embroidery pattern onto your fabric or create your own design. Consider incorporating various stitches to add texture and depth to your artwork. Some stitches to explore include satin stitch for filling in shapes, French knots for adding dimension, and backstitch for outlining.
- Thread Selection: With your design in mind, select the appropriate embroidery floss colors. Mix and match shades to capture the vibrant and refreshing essence of spring. Experiment with different thread thicknesses to achieve the desired visual effects.
- Embroider with Precision: Begin your embroidery work, carefully executing each stitch according to your design. Pay close attention to detail, as the precision of your stitches will contribute to the overall aesthetic of your hoop art.
- Variety and Creativity: Don't be afraid to get creative! Experiment with different stitch combinations and techniques to create unique textures and effects within your embroidery. Consider using variegated threads for a subtle gradient effect.
- Finishing Touches: Once your embroidery is complete, ensure all threads are securely fastened. Trim any excess thread on the backside of your fabric.
- Display Your Art: Your embroidered spring hoop art is now ready to be showcased. Hang it on the wall as a beautiful piece of decorative art, or use it as a charming accent on shelves, in table displays, or even as part of a larger textile project.
The Benefits of Spring Crafting for Adults
Before delving into the delightful world of spring craft ideas, it's essential to grasp why engaging in crafting during this vibrant season holds such immense value for adults.
Stress Relief
Crafting serves as a powerful antidote to the stresses and pressures of modern life. The act of creating art with your hands is inherently calming. It engages your mind and senses, redirecting your focus away from daily anxieties and worries. As you immerse yourself in the creative process, you experience a soothing rhythm that melts stress away. The tactile nature of crafting, whether it's molding clay, stitching fabric, or painting, can induce a state of mindfulness that promotes relaxation and reduces anxiety.
Seasonal Connection
Spring is a time of renewal and transformation in the natural world, and crafting during this season allows you to align with this inherent beauty. Incorporating spring-specific elements like blooming flowers, soft pastel colors, and nature-inspired designs into your crafting projects establishes a deep connection with the changing environment. As you infuse your creations with these springtime motifs, you'll find yourself more attuned to the awakening of nature, fostering a sense of harmony and rejuvenation.
Personal Fulfillment
Crafting is a journey of self-expression and creativity. Each completed craft project is a tangible representation of your artistic abilities and the effort you invested. This sense of accomplishment not only boosts your self-esteem but also instills a profound sense of fulfillment. Whether it's a beautifully hand-painted vase, an intricately embroidered hoop, or a meticulously sculpted clay figure, each creation tells a story of your creativity, skill, and dedication.
Social Interaction
Crafting transcends the solitary experience and often becomes a social activity. Consider inviting friends, family members, or even neighbors to join you in crafting sessions. This shared creative endeavor not only fosters deeper social connections but also creates lasting memories. Engaging in conversations, exchanging tips and techniques, and collaborating on projects can turn crafting into a delightful social bonding experience.
Tips for Crafting Success
Stay Organized for a Seamless Experience
Preparation is key to a stress-free crafting session. Begin by gathering all the necessary materials and tools before you dive into your project. Ensure you have ample workspace and well-organized supplies to prevent interruptions and keep your creative flow uninterrupted.
Embrace Imperfections as Part of the Charm
Crafting is a celebration of creativity, and perfection is not the ultimate goal. Instead of fixating on flawless outcomes, relish in the uniqueness and character of handmade creations. Imperfections often add a personal touch and a story to your crafts. Embrace them as part of the artistic journey, and let go of the pressure to achieve absolute precision.
Explore and Experiment Freely
While this guide provides valuable inspiration, remember that crafting is all about exploration and self-expression. Don't hesitate to venture beyond the boundaries of suggested projects and techniques. Experiment with different materials, color palettes, and styles to uncover your own unique artistic voice. The most captivating crafts often emerge from daring to be different.
Upcycle and Repurpose for Sustainability
Crafting doesn't have to involve buying new materials every time. Take a sustainable approach by exploring items around your home that can be repurposed for your projects. Old fabrics, unused containers, or even discarded decorations can find new life in your spring crafts. Not only does upcycling reduce waste, but it also adds a layer of eco-consciousness to your creative endeavors.
Wrapping Up
Crafting during the spring season holds a special place in my heart, offering a chance to connect with the season's renewal and transformation. It's not just about the final creations; it's about the therapeutic escape, the creative journey, and the mindfulness that each project brings.
Through crafting, I've found stress relief, a deeper connection to nature, and a profound sense of personal fulfillment. It's a shared adventure that allows for bonding with loved ones and a sustainable endeavor through upcycling and repurposing materials.
As I eagerly anticipate the arrival of spring, I look forward to the joy and creativity that crafting brings, infusing my life with the vibrant colors and vitality of the season.
Sources
https://www.norfolk.gov.uk/education-and-learning/adult-learning/courses/creative-and-cultural
https://louisvilleky.gov/events/spring-fling-mellwood-art-center