DIY Over the Toilet Storage
As someone who constantly seeks ways to optimize space in my home, I've found that the bathroom, often the tiniest room, presents a unique challenge. But it's also an opportunity for creativity. So, I've dived into the world of DIY over-the-toilet storage solutions.
These projects aren't just functional; they're a chance to infuse my personality into my bathroom while keeping everything neatly organized. From organizing toiletries to towels, I've explored various ideas, followed step-by-step instructions, and discovered tips to transform my bathroom into a space-saving and visually appealing oasis.
The Importance of Bathroom Storage
Before delving into various DIY over-the-toilet storage solutions, it's crucial to grasp the importance of having sufficient storage in your bathroom. Bathroom storage is more than just a convenience; it plays a pivotal role in enhancing both the functionality and aesthetics of this essential space. Here's a deeper look at why bathroom storage is indispensable:
- Clutter Reduction: Ample storage options help keep your bathroom organized and clutter-free. A tidy bathroom not only looks better but also promotes a sense of tranquility and relaxation. Say goodbye to the stress of searching for your toiletries amidst a mess.
- Efficiency Boost: Well-designed bathroom storage solutions streamline your daily routine. When everything has its designated place, you can access your essentials effortlessly, saving valuable time during your morning rush.
- Space Optimization: Particularly in compact bathrooms, every inch of space counts. Effective use of vertical space, such as above the toilet, is vital for maximizing the available square footage. Clever storage solutions can make even the tiniest bathrooms feel more spacious and functional.
- Personalization: DIY bathroom storage projects offer an opportunity for personalization. You can tailor your storage solutions to match your unique style and preferences, ensuring that your bathroom reflects your personality and meets your specific needs. Whether you prefer a sleek, modern design or a rustic, vintage look, DIY projects enable you to create a bathroom that feels truly your own.
Now that we've established the importance of bathroom storage, let's explore various DIY over the toilet storage.
DIY Over the Toilet Storage
When it comes to maximizing the space above your toilet, there's a plethora of creative DIY solutions to consider. These options not only enhance your bathroom's functionality but also add a touch of personalization to your decor. Let's delve into some versatile and imaginative DIY over the toilet storage ideas:
Floating Shelves
Floating shelves are a favored choice for over the toilet storage due to their clean lines and adaptability. These shelves create an open and spacious ambiance in your bathroom while offering a platform for various items. You can use them to display decorative pieces, store toiletries, showcase your favorite reads, or even nurture small indoor plants. Their simplicity makes them an ideal choice for a range of bathroom styles.
Wall-Mounted Cabinets
If you prefer concealed storage with a touch of sophistication, consider wall-mounted cabinets. These cabinets come in an array of sizes and designs, making it easy to find one that harmonizes with your bathroom's aesthetics. Wall-mounted cabinets keep your toiletries and towels organized, secure, and easily accessible. They are perfect for maintaining a clutter-free bathroom.
Ladder Shelves
Ladder shelves offer a blend of style and space-saving functionality. These leaning shelves can be placed against the wall, providing open shelving for towels, baskets, and an assortment of bathroom essentials. The versatility of ladder shelves means you can adapt their appearance to match your bathroom's color scheme or overall theme.
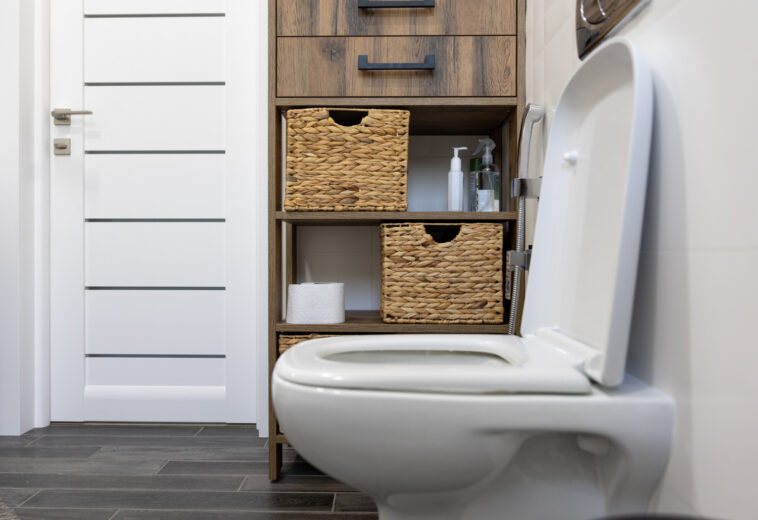
Crates and Baskets
For a rustic and charming look, consider repurposing wooden crates and wicker baskets as over the toilet storage units. These versatile containers can be stacked, placed on shelves, or hung on the wall. They not only add a touch of warmth and character to your bathroom but also provide functional storage for towels, toiletries, and other accessories.
Custom-Built Storage Units
In cases where your bathroom has unique dimensions or specific storage needs, custom-built storage units offer a tailored solution. By working with a skilled craftsman or using your DIY expertise, you can create storage units that fit your space perfectly. These units can be designed to accommodate your exact requirements, ensuring that no inch of space goes to waste.
Now, let's move on to the practical aspects of these DIY projects.
Materials and Tools You'll Need
Embarking on a DIY over the toilet storage project requires careful planning and preparation. Ensuring you have the right materials and tools at your disposal is crucial to a successful and hassle-free execution. While the specific requirements can vary depending on the chosen project, here's a comprehensive list of materials and tools to help you get started:
Materials
- Wood Boards or Planks: Depending on your project, you'll need wooden boards or planks of appropriate sizes and types. These will serve as the foundation for your storage solution, such as shelves or cabinet components.
- Wall Anchors and Screws: For securing your storage unit to the wall, you'll need wall anchors and screws. The type and size of these fasteners should be compatible with the weight and design of your storage solution.
- Wooden Crates or Baskets: If you're opting for a rustic or eclectic look, wooden crates or wicker baskets will be essential components for your storage project. These containers add character and functionality to your over-the-toilet setup.
- Paint, Stain, or Finish (for Customization): To match your storage solution with your bathroom's decor or personal style, you may need paint, stain, or a finish. These materials allow you to customize the appearance of your project, making it uniquely yours.
- Cabinet Hardware (if applicable): For projects involving cabinets or doors, cabinet hardware such as handles or knobs may be necessary. These small details can greatly enhance the functionality and aesthetics of your storage unit.
- Ladder or Pre-Made Ladder Shelves (if opting for ladder shelves): If ladder shelves are your chosen design, you'll either need to build a ladder frame or purchase pre-made ladder shelving units.
Tools
- Tape Measure: A tape measure is essential for accurately measuring and marking the dimensions of your bathroom space and materials.
- Level: A level ensures that your storage unit is installed or constructed perfectly horizontally or vertically, preventing any unsightly tilting.
- Saw: Depending on your project, you may need a saw to cut wooden boards or planks to the desired sizes and angles.
- Drill and Drill Bits: A drill is indispensable for making holes for screws and wall anchors. Ensure you have the appropriate drill bits for your fasteners.
- Screwdriver: A screwdriver, either manual or electric, is necessary for driving screws into the wall anchors and attaching hardware.
- Sandpaper: Sandpaper allows you to smooth out rough edges, surfaces, or imperfections in your wooden materials before finishing or painting.
- Paintbrushes and Rollers (if painting or staining): If you plan to paint or stain your project, you'll need paintbrushes and rollers for an even and professional finish.
Before purchasing materials, measure the space above your toilet to ensure that your chosen storage solution fits comfortably.
Step-by-Step DIY Over the Toilet Storage Projects
Now, let's delve into the step-by-step instructions for five popular DIY over the toilet storage projects:
Building Floating Shelves
Floating shelves are an adaptable and attractive option for your bathroom's over-the-toilet storage needs. Building your own custom floating shelves allows you to tailor them to your preferred length and style, ensuring a perfect fit for your bathroom.
Here's a detailed guide on how to create these versatile storage solutions:
Materials You'll Need
- Wood Boards or Planks: Select wood boards or planks of the desired length, width, and thickness for your shelves. Consider the weight-bearing capacity of the wood, especially if you plan to store heavy items on the shelves.
- Wall Anchors and Screws: To securely attach the shelves to the wall, you'll need wall anchors and screws. The size of these fasteners should be appropriate for the weight and dimensions of your shelves.
- Level: A level ensures that your shelves are installed perfectly horizontally, preventing any slant or unevenness.
Steps to Build Floating Shelves
- Measure and Mark the Shelf Length: Begin by measuring and marking the desired shelf length on the selected wood boards. Use a tape measure and pencil to make precise marks.
- Cut the Boards to Length: Carefully cut the boards along the marked lines using a saw. Ensure your cuts are straight and clean for a professional finish.
- Sand the Edges and Surfaces: Use sandpaper to smooth the edges and surfaces of the cut boards. Sanding helps remove any rough spots, splinters, or imperfections, ensuring a safe and polished look for your shelves.
- Locate Wall Studs or Use Wall Anchors: Determine the placement of your shelves on the wall. Ideally, you should secure them to wall studs for maximum stability. Use a stud finder to locate the studs, or if they don't align with your desired shelf placement, use wall anchors for secure mounting.
- Attach Shelf Brackets to the Wall: Install shelf brackets on the wall at the desired height and spacing for your shelves. Ensure that the brackets are level by using a level tool during installation. Secure them firmly with wall anchors or screws into wall studs.
- Place the Cut Boards on the Brackets: Position the cut wooden boards onto the installed brackets, ensuring they align with the brackets' support arms. Use screws to secure the boards onto the brackets securely. Make sure they are level and stable.
- Repeat for Multiple Shelves: If you're installing multiple shelves, repeat the process, spacing them as desired to accommodate your storage needs.
Crafting Wall-Mounted Cabinets
When you're aiming for concealed and polished storage in your bathroom, wall-mounted cabinets are an excellent choice. Crafted with careful attention to detail, they offer both functionality and aesthetics.
Here's a step-by-step guide on how to create your own wall-mounted cabinets:
Materials You'll Need:
- Wall-Mounted Cabinet Kit: Purchase a wall-mounted cabinet kit that suits your bathroom's dimensions and style. These kits typically include all the necessary components, such as cabinet panels, shelves, and hardware.
- Wall Anchors and Screws: To securely attach the cabinet to the wall, you'll need wall anchors and screws. Ensure that the size and type of these fasteners are appropriate for the weight and dimensions of the cabinet.
- Drill: You'll need a power drill with the appropriate drill bits for making holes in both the cabinet and the wall.
- Screwdriver: A screwdriver, either manual or electric, will be necessary for driving screws into the cabinet and wall.
Steps to Craft Wall-Mounted Cabinets:
- Assemble the Wall-Mounted Cabinet: Follow the detailed instructions provided with your wall-mounted cabinet kit to assemble it correctly. This typically involves attaching cabinet panels, shelves, and other components to create the cabinet structure.
- Locate Wall Studs or Use Wall Anchors: To ensure a secure installation, locate and mark the positions of wall studs where you intend to mount the cabinet. Wall studs provide the most robust support. Use a stud finder to identify their locations. If the studs don't align with your desired cabinet placement, use wall anchors to achieve secure mounting.
- Position the Cabinet at the Desired Height: Carefully determine the desired height for your cabinet, considering both functionality and aesthetics. Use a level to ensure the cabinet is perfectly horizontal, preventing any slant or unevenness.
- Mark the Locations for Screws on the Cabinet Back: With the cabinet properly positioned, mark the locations on the back of the cabinet where you'll be attaching it to the wall. These marks will guide your drilling.
- Drill Pilot Holes: Drill pilot holes into the marked locations on the cabinet back. Pilot holes prevent wood splitting and make it easier to drive screws into the cabinet.
- Secure the Cabinet to the Wall: Finally, using screws, attach the cabinet to the wall by driving the screws through the pilot holes into the wall studs or wall anchors. Ensure a snug and secure fit. Check that the cabinet is level one last time before tightening the screws.
Assembling Ladder Shelves
Ladder shelves are a contemporary and space-saving choice that can add both storage and aesthetic appeal to your bathroom. Assembling them is relatively straightforward, and they offer a unique shelving solution.
Here's a detailed guide on how to assemble ladder shelves:
Materials You'll Need:
- Pre-made Ladder Shelves: You can purchase pre-made ladder shelves from a store or online retailer. These typically come with all the necessary components and instructions for assembly.
Steps to Assemble Ladder Shelves:
- Purchase or Assemble Pre-Made Ladder Shelves: Begin by either purchasing pre-made ladder shelves from a store or assembling a kit according to the manufacturer's instructions. When selecting ladder shelves, consider the size, style, and finish that best complements your bathroom decor.
- Place the Ladder Against the Wall: Position the ladder against the wall where you intend to install it. Ensure that it is level both horizontally and vertically. A level will help you make any necessary adjustments to ensure the ladder is perfectly aligned.
- Arrange the Shelves on the Ladder Rungs: Depending on the design of your ladder shelves, you will have shelves that attach to the ladder rungs in different ways. Follow the manufacturer's instructions for attaching the shelves securely. Typically, this may involve using screws, brackets, or other fasteners to secure the shelves in place.
- Secure the Shelves in Place: Once you have arranged the shelves to your liking and attached them to the ladder rungs, make sure they are securely fastened. Double-check that each shelf is level and stable. Tighten any screws or fasteners as needed to ensure a secure fit.
- Final Adjustments: Stand back and review the placement of the ladder shelves. Ensure they are level and aesthetically pleasing in your bathroom. Make any final adjustments as necessary.
Using Crates and Baskets
If you're looking for a rustic and creatively inspired storage solution, repurposing wooden crates and wicker baskets can infuse warmth and character into your bathroom decor.
Here's a comprehensive guide on how to use these materials effectively:
Materials You'll Need:
- Wooden Crates or Wicker Baskets: Gather wooden crates or wicker baskets in the sizes and styles that suit your bathroom decor and storage needs. You can often find these items at thrift stores, home improvement stores, or even repurpose existing ones.
- Wall Anchors and Screws: To securely mount the crates or baskets to the wall, you'll require wall anchors and screws. Choose the appropriate size and type of fasteners based on the weight and dimensions of the containers.
Steps to Utilize Crates and Baskets for Storage:
- Measure and Mark the Spacing for the Crates or Baskets: Begin by determining the ideal spacing and arrangement of the crates or baskets on the wall. Use a tape measure and pencil to mark the positions where you'll mount them. Consider both functionality and aesthetics when deciding on the layout.
- Locate Wall Studs or Use Wall Anchors: To ensure secure mounting, identify and mark the positions of wall studs where you intend to attach the crates or baskets. Wall studs offer the strongest support. You can use a stud finder to pinpoint their locations. In cases where the studs don't align with your desired placement, use wall anchors to provide stable mounting points.
- Secure the Crates or Baskets to the Wall: With the positions marked and the wall anchors or wall studs identified, proceed to attach the crates or baskets to the wall. For wooden crates, you may need to drill holes in the back or sides and use screws to affix them to the wall. For wicker baskets, you can use hooks or brackets to hang them securely. Ensure each crate or basket is level and firmly attached to the wall.
- Final Arrangement and Styling: Once all the crates or baskets are securely in place, step back and review the arrangement. Make any necessary adjustments to achieve your desired look and functionality. You can use these containers to store towels, toiletries, plants, or decorative items, adding both utility and charm to your bathroom space.
Now that you have the steps for these DIY projects, let's move on to some tips for a successful DIY project.
Tips for a Successful DIY Project
Embarking on a DIY over-the-toilet storage project can be a rewarding endeavor, but it requires careful planning and execution. To help you achieve the best results, consider these comprehensive tips:
Plan and Measure Precisely
Before diving into your project, take the time to plan and measure meticulously. Assess the available space above your toilet and determine the exact dimensions and style of storage solution that will work best. Accurate measurements are crucial to ensuring that your storage unit fits perfectly and complements the layout of your bathroom.
Prioritize Safety
Safety should always be your top priority when working on any DIY project. Wear appropriate safety gear, such as safety glasses and gloves, to protect yourself from potential hazards. Additionally, ensure that your work area is well-ventilated and adequately lit.
Invest in Quality Materials
The longevity and durability of your DIY over-the-toilet storage depend on the quality of the materials you use. Invest in high-quality wood, hardware, and fasteners to ensure that your storage solution can withstand daily use and the bathroom's humid environment.
Follow Instructions Closely
Whether you're using pre-made kits or following online tutorials, it's essential to adhere to the provided instructions. Pay close attention to every step of the process to achieve the best results. Deviating from instructions can lead to structural weaknesses or aesthetic inconsistencies.
Test for Stability
Before considering your project complete, thoroughly test the stability of your storage solution. Ensure that it is securely anchored to the wall, with wall anchors or screws fastened securely into wall studs. Test the unit's ability to support the weight of your bathroom items to prevent any unexpected accidents.
Apply Finishing Touches
To enhance the appearance and protect your DIY storage from moisture, consider applying finishing touches. Painting, staining, or sealing the wood can not only match your bathroom's decor but also safeguard the wood against humidity and moisture damage.
Maintenance and Care
After successfully completing your DIY over-the-toilet storage project, it's crucial to implement a maintenance routine to preserve its longevity and functionality. Here are comprehensive maintenance and care tips to keep your storage solution in excellent condition:
Routine Cleaning and Dusting
Regular cleaning and dusting are essential to prevent the buildup of dirt, grime, and dust on your shelves or cabinets. Use a soft cloth or duster to gently wipe down the surfaces, removing any particles that may accumulate over time. Pay attention to the corners and crevices where dust tends to settle.
Inspection for Loose Fasteners
Periodically inspect your storage unit for any loose screws, brackets, or hardware. Over time, vibrations or usage can cause these components to become less secure. Tighten any loose fasteners to maintain the stability of your storage solution and prevent potential accidents.
Vigilance Against Water Damage
Bathrooms are inherently humid environments, making them susceptible to water damage over time. Keep a watchful eye for any signs of water damage, such as warping, discoloration, or peeling on the wood or any other materials. If you detect such issues, address them promptly to prevent further deterioration.
Protective Measures
Consider implementing protective measures to safeguard your DIY storage against the effects of humidity and moisture. Applying a moisture-resistant finish or sealant can help shield the wood from potential water damage, prolonging its lifespan. Ensure that any exposed screws or fasteners are adequately sealed to prevent moisture intrusion.
Periodic Re-finishing or Repainting
To maintain the appearance of your storage unit and protect it from moisture, consider periodically re-finishing or repainting the wood. This not only refreshes its visual appeal but also adds an extra layer of defense against humidity.
Organized Storage Habits
Encourage organized storage habits to prevent overloading your shelves or cabinets. Avoid placing excessively heavy items that may strain the structure and cause damage over time. Distribute the weight evenly and use storage bins or containers to keep items organized.
Conclusion
Embarking on DIY over-the-toilet storage projects has truly transformed my bathroom into a personalized oasis of order and style. These endeavors have not only maximized space but also instilled in me the importance of efficient bathroom storage. They've brought an end to daily struggles with clutter, allowing for more serene and efficient daily routines.
Through careful planning, safety precautions, and attention to detail, I've discovered that DIY projects can be both aesthetically pleasing and functional. And while the journey doesn't end with completion, with regular maintenance and care, these projects continue to serve as a testament to the beauty of creative home improvement.
They've not only enhanced my bathroom but also broadened my perspective on how small spaces can be transformed into harmonious blends of form and function, inspiring further exploration of space optimization in my home.
Sources:
https://engineeryourspace.com/diy-over-the-toilet-storage-cabinet/
https://tinselandwheat.com/toilet-storage-ladder-build-plans/