DIY Lawn Striper
As a passionate lawn enthusiast, I've often found myself admiring the immaculate, striped lawns of golf courses and sports fields, wishing I could replicate that pristine look in my own backyard. Fortunately, I discovered that those stunning, contrasting stripes aren't exclusive to the pros.
With a little DIY ingenuity and determination, I embarked on a journey to create my own lawn striper, and the results have been nothing short of amazing. In this guide, I'll take you through the rewarding process of achieving professional-looking lawn stripes without breaking the bank, sharing the steps I took to craft my very own DIY lawn striper.
What Causes Lawn Stripes?
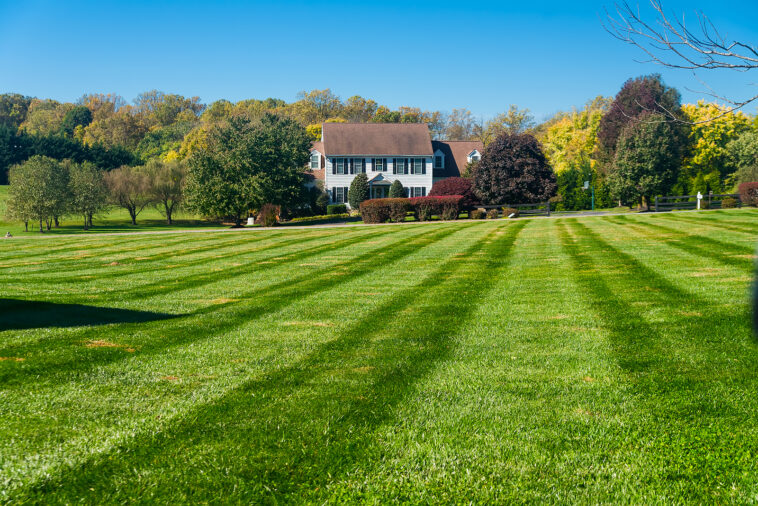
Lawn stripes, those captivating patterns adorning well-manicured lawns, are a fascinating natural phenomenon rooted in the intricate interplay between grass blades and light. This optical illusion can be explained through the following science:
The fundamental principle underlying lawn stripes is surprisingly straightforward. When blades of grass are bent in one direction, they alter the way they interact with light compared to when they are bent in the opposite direction. This alteration in light reflection results in the distinct striped appearance that we admire on lawns. To delve deeper into this phenomenon, consider the following:
- Light Reflection: Grass blades that are bent toward an observer appear darker, creating the illusion of a dark stripe. Conversely, grass blades bent away from the viewer seem lighter, forming a light stripe. This dichotomy in light reflection is the cornerstone of the striped pattern we see on well-maintained lawns.
- Mower Attachment: Achieving these crisp and visually pleasing stripes typically involves the use of a specialized lawn striper attachment on a mower. This attachment is designed to manipulate the grass blades during the mowing process. By gently bending the grass in specific directions, it enhances the contrast between the dark and light stripes, resulting in a striking visual effect.
- Grass Species and Health: The type of grass and its overall health also play a role in the quality of lawn stripes. Certain grass species respond more effectively to bending, creating more pronounced stripes. Moreover, a healthy lawn with well-nourished and hydrated grass blades is more likely to produce vibrant and defined stripes.
- Mowing Technique: Achieving perfect lawn stripes is not solely dependent on the striper attachment. The mowing technique also matters. Mowing in straight, parallel lines and alternating the direction with each subsequent pass enhances the visual impact of the stripes.
Benefits of Lawn Striping
Enhanced Aesthetic Appeal
The most obvious and immediate advantage of lawn striping is the transformation it imparts to your lawn's appearance. The precise, alternating dark and light stripes create a captivating visual effect that adds a touch of professionalism and elegance to any landscape. It becomes a focal point, leaving a lasting impression on visitors and passersby.
Promotion of Healthier Grass
Beyond the visual appeal, striping your lawn plays a significant role in maintaining the overall health of your grass. Regular mowing and striping not only control the height of the grass but also stimulate its growth. The bending of grass blades during striping encourages lateral growth and tillering, resulting in a denser, healthier lawn. Additionally, the uniform cutting height ensures an even dispersal of sunlight and nutrients, promoting consistent growth and vigor.
Nutrient Distribution
Proper striping technique ensures that the grass clippings are distributed evenly across the lawn. These clippings act as a natural fertilizer, returning essential nutrients to the soil as they decompose. This recycling of nutrients can lead to a more sustainable and cost-effective lawn care routine.
Increased Property Value
A well-maintained lawn, complete with meticulously striped patterns, can significantly enhance the value of your property. If you're considering selling your home, a lush, striped lawn can be a powerful selling point. Potential buyers are often drawn to properties with beautifully landscaped lawns, and it can potentially increase your property's market value.
Pride and Enjoyment
Maintaining a striped lawn isn't just about impressing others; it's also about taking pride in your outdoor space. The satisfaction of achieving those perfect stripes and enjoying a well-kept lawn can be a source of personal pride and joy. It provides a serene and inviting environment for outdoor activities and relaxation.
Environmental Benefits
The even distribution of grass clippings and the overall health of the lawn achieved through striping can contribute to a more eco-friendly approach to lawn care. A healthier lawn requires less water and chemical inputs, reducing the environmental impact of maintenance.
Materials Needed for DIY Lawn Striper
Creating your own DIY lawn striper can be a rewarding project, and having the right materials is essential for its success. Here's a detailed list of the materials you'll need to craft your very own lawn striper:
- PVC Pipe: The core component of your lawn striper, PVC pipe serves as the container for the weight that bends the grass blades. Opt for a sturdy PVC pipe of the desired length, typically around 4 to 6 feet, depending on your mower's size and your lawn's layout.
- End Caps: You'll require two end caps, one for each end of the PVC pipe. These caps not only seal the pipe but also ensure that the sand or weight inside remains securely in place.
- Sand: The sand serves as the crucial weight inside the PVC pipe. The quantity of sand you'll need depends on the size and length of the pipe. Generally, a few pounds of sand should suffice, but you may need more for larger pipes.
- Heavy-duty Velcro Straps or Brackets: These are used to attach the striper securely to your lawnmower. The choice between heavy-duty Velcro straps or brackets depends on your preference and the compatibility with your mower. Straps can be versatile and easy to adjust, while brackets offer a more permanent attachment.
- Drill and Screws: You'll need a drill along with screws to secure the end caps in place, ensuring that they remain tightly sealed. Additionally, you'll use screws to fasten the brackets if you choose this attachment method.
Optional Materials for Added Functionality:
- Paint and Brushes: If you want to add a decorative touch to your lawn striper, consider using paint and brushes to customize its appearance. This step is entirely optional but can make your DIY project even more appealing.
- Handle or Grip: Attaching a handle or grip to the PVC pipe can make it easier to maneuver and control the lawn striper while mowing. This addition can enhance your comfort and precision during the striping process.
- Level Indicator: To ensure that your lawn striper is properly aligned and creating even stripes, you might want to add a level indicator. This can be as simple as a bubble level attached to the PVC pipe.
- Padding or Cushioning: To protect your lawn from potential damage caused by the weight of the striper, you can add padding or cushioning to the bottom of the PVC pipe. Foam or rubber padding works well for this purpose.

Step-by-Step Guide to Building Your DIY Lawn Striper
Step 1: Measure the PVC Pipe
Begin by measuring the width of your lawnmower's cutting deck. Your PVC pipe should be slightly longer than this width to ensure it covers the entire swath of grass that your mower will cut. Selecting the right length is crucial for achieving consistent and even stripes on your lawn.
Step 2: Seal One End
Using a drill and appropriate screws, securely attach one of the end caps to one side of the PVC pipe. This end cap not only seals the pipe but also provides structural stability to your lawn striper. Ensure it is firmly in place to prevent sand leakage.
Step 3: Fill with Sand
Now, it's time to add the sand. Pour the sand into the PVC pipe until it's nearly full. The sand serves as the essential weight that will bend the grass blades as you mow. The quantity of sand you use will depend on the size of your PVC pipe and the desired weight; it should be substantial enough to create the desired striping effect.
Step 4: Seal the Other End
Attach the second end cap to the other side of the PVC pipe, sealing the sand securely inside. Just like the first end cap, make sure it's fastened tightly to prevent any sand from escaping during use.
Step 5: Attach the Striper to Your Lawnmower
For the final step, you'll need to attach the lawn striper to your lawnmower. You can do this using heavy-duty Velcro straps or brackets, depending on your preference and the compatibility with your mower's design.
- Using Velcro Straps: Wrap the Velcro straps around the PVC pipe and your lawnmower's handlebar or other suitable attachment points. These straps are versatile and adjustable, making them easy to use and reposition as needed.
- Using Brackets: If you opt for brackets, secure them to the PVC pipe with screws. Then, fasten the brackets to your lawnmower, ensuring that the PVC pipe has good contact with the grass as you mow.
Additional Tips:
- Alignment: Pay attention to the alignment of your lawn striper. It should be centered behind your lawnmower to create symmetrical stripes. Using a bubble level can help ensure the striper is level and straight.
- Customization: Feel free to customize your lawn striper's appearance with paint or decorative elements if desired.
- Practice: It may take a bit of practice to master the art of creating perfect lawn stripes. Experiment with mowing patterns and directions to achieve your desired look.
Tips for the Best Stripes on Your Lawn
Achieving the perfect lawn stripes involves a combination of technique and strategy. To help you create the most striking and professional-looking stripes on your lawn, consider these tips, which provide not only aesthetic benefits but also promote the overall health of your grass:
Mow High for Noticeable Stripes
Set your lawnmower to a taller grass-cutting height. Taller grass bends more noticeably, which results in more distinct and attractive stripes. Keep in mind the recommended mowing height for your specific grass type, as cutting too low can stress the grass and hinder stripe formation.
Change Mowing Patterns Regularly
To maintain the health of your lawn and prevent soil compaction, vary your mowing pattern every few weeks. Altering the direction of your mowing lines ensures that the grass blades don't develop a permanent lean in one direction and helps distribute wear more evenly across your lawn.
Follow a Straight Line
The first stripe you mow sets the foundation for the entire striped pattern. To achieve straight and well-aligned stripes, use a landmark as a reference point. A physical reference, such as a straight edge of your driveway or a taut string, can help you maintain a straight path. Once the first stripe is straight, subsequent stripes will naturally follow suit.
Double Stripe Technique
For an even more pronounced and bold striped appearance, employ the double stripe technique. Mow the lawn in one direction for your initial pass, creating the first set of stripes. Then, immediately mow back over the same area in the opposite direction. This additional pass bends the grass blades further and enhances the contrast between light and dark stripes, resulting in a visually striking effect.
Lawn Striper Attachment
Consider using a lawn striper attachment if you have access to one. These attachments, whether homemade or commercially available, are designed to manipulate the grass blades during mowing, enhancing the striping effect. They can make it easier to achieve consistent and professional-looking stripes.
Lawn Health Maintenance
Ensure your lawn is well-nourished, adequately watered, and free from pests and diseases. Healthy grass is more responsive to striping techniques, and it will recover faster from the stress of mowing.
Regular Maintenance
Keep your lawnmower in good working condition. Dull blades can tear the grass rather than cutting it cleanly, leading to less defined stripes. Sharpen the mower blades regularly to maintain a crisp appearance.
Practice and Patience
Achieving perfect lawn stripes may require some practice and patience. Experiment with different techniques and observe how your grass responds. Over time, you'll develop the skills to create the desired striped effect.
Maintenance and Storage of Your DIY Lawn Striper
Check for Leaks
Regularly inspect your PVC pipe for any signs of leaks or damage. Over time, wear and tear, as well as potential cracks, can develop. A leaking PVC pipe can result in uneven striping and a compromised striping effect. If you notice any leaks, promptly address them. Additionally, if the sand inside the pipe becomes wet due to leaks or exposure to moisture, consider replacing it to maintain the desired weight for bending grass blades effectively.
Clean After Use
After each use, take a few moments to clean your DIY lawn striper. Remove any grass clippings or debris that may have accumulated on the exterior of the PVC pipe. Cleaning it after use not only keeps it looking tidy but also helps prevent corrosion and ensures optimal performance during your next striping session.
Store in a Dry Place
To maximize the lifespan of your lawn striper, store it in a dry and shaded area when it's not in use. Exposure to sunlight and moisture can degrade the PVC pipe over time. A covered storage area, such as a garage or shed, provides protection from the elements and helps prevent premature deterioration.
Sand Replacement Considerations
If you've used your DIY lawn striper for an extended period or if you've encountered issues with sand leakage or clumping, consider periodically replacing the sand inside the PVC pipe. Fresh sand ensures that your striper maintains its desired weight, which is essential for creating well-defined stripes.
Inspect Straps or Brackets
If your lawn striper is attached to your lawnmower using Velcro straps or brackets, periodically check these attachment points for wear and tear. Ensure they are securely fastened and in good condition. If any components show signs of damage, replace them to maintain a stable and safe attachment.
Periodic Reinforcement
Depending on your usage frequency and the quality of materials used in your DIY lawn striper, you may need to reinforce or replace parts over time. PVC pipes, end caps, and attachment mechanisms may require periodic maintenance or replacement to keep the striper in optimal working condition.
Record Keeping
Maintain a record of your maintenance activities, such as sand replacement and inspections. This record can help you track the striper's performance and identify any patterns of wear or damage that require attention.
Conclusion
In summary, my personal journey into the world of DIY lawn striping has been a deeply rewarding adventure. As a passionate lawn enthusiast, I've not only admired the exquisite stripes on professional lawns but also taken on the challenge of recreating them in my own backyard.
This endeavor has not only enriched the visual appeal of my lawn but also provided a source of pride, joy, and a deeper connection to my outdoor space. Crafting and maintaining my DIY lawn striper has not only yielded stunning results but also taught me the power of personal effort and ingenuity in achieving professional-looking outcomes.
For anyone with a love for well-manicured lawns, I wholeheartedly encourage you to embark on your own DIY striping journey—it's a rewarding endeavor that transforms your landscape and elevates your connection to your outdoor environment.
Sources
https://www.fhwa.dot.gov/publications/research/safety/00067/00067.pdf
https://transportation.wv.gov/highways/traffic/Pages/default.aspx