DIY Broken Mirror
When I accidentally shattered a mirror, I couldn't help but feel a wave of superstition wash over me. They say it's seven years of bad luck, right? But instead of dwelling on the negative, I decided to take a different approach. I saw an opportunity to turn those broken mirror shards into something beautiful and unique, and I'm excited to share my journey with you in this comprehensive guide.
So, let's dive in together and discover several innovative ways to repurpose and upcycle your DIY broken mirror. With a bit of creativity and a touch of inspiration, you can transform misfortune into an artistic masterpiece that reflects your personal style and ingenuity.
Safety First: Handling Broken Mirror Pieces
When undertaking any DIY project, particularly one involving broken materials like mirrors, prioritizing safety is essential. Here's an expanded guide on how to fix a cracked mirror pieces safely:
Preparation is Key
Before starting any cleanup process, ensure you're in the right mindset and have all the necessary tools on hand. This isn't a task to be rushed.
Wear Protective Gear
- Gloves: Always wear thick gloves, preferably made of leather or a heavy-duty material, to protect your hands from sharp edges.
- Safety Goggles: Tiny fragments can easily fly off when handling broken mirrors. Protect your eyes by wearing safety goggles.
- Closed Shoes: Ensure you're wearing shoes that fully cover your feet. This will protect against any shards that might fall on the ground.
Clean the Area Efficiently
- Start with Larger Shards: Carefully pick up the larger pieces of the broken mirror step and place them in a thick, sturdy container. Cardboard boxes double-layered or a strong plastic bucket are good choices.
- Use a Damp Paper Towel: For the smaller shards that might be difficult to see, gently press a damp paper towel over the area. This will help in lifting those tiny fragments.
- Use a Torch or Flashlight: Scan the area with a light source held at a low angle. This will help highlight even the smallest shard that might otherwise go unnoticed.
Work on a Stable Surface
Ensure the surface where you're placing the collected pieces is stable and flat. This minimizes the risk of causing further damage to the mirror or injury to yourself. If the broken mirror is still in its frame or mount, make sure it's secured before attempting to remove any pieces.
Dispose of Broken Mirror Safely
Once all pieces have been collected, seal the container and mark it clearly as “Broken Glass.” When discarding, ensure it’s placed where others won’t accidentally come into contact with it.
Double-Check
After you believe you've cleaned up all the pieces, take a moment to double-check the area, especially if children or pets are around. Safety always comes first, and it's better to be extra cautious.

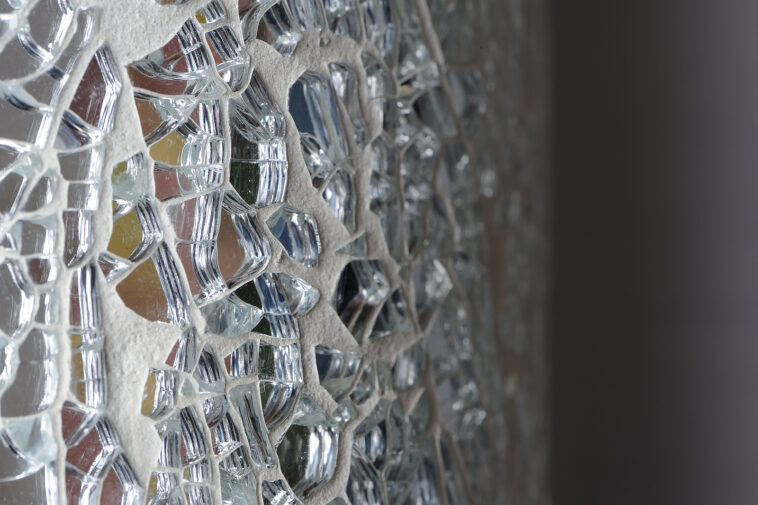
DIY Broken Mirror Mosaic Wall Art
Experience the allure of reflective art by creating a captivating mosaic using broken mirror pieces. Not only will this unique piece add a touch of sophistication to any space, but it also offers an excellent way to repurpose old or broken mirrors. Here's an extended guide to help you through every step of the process.
Materials Needed:
- Broken Mirror Pieces: Collect fragments from an old or broken mirror. Ensure sharp edges are handled with care to avoid injury.
- Mosaic Tiles (Optional): These can add color and contrast to your mosaic design.
- Strong Adhesive Glue: Ensure it's suitable for glass and provides a strong bond.
- Grout: Opt for a color that complements or contrasts with your mirror pieces and tiles. Pre-mixed grout is convenient, but you can also buy powdered grout and mix it according to package instructions.
- A Base: This can be a canvas, wooden board, or any flat surface sturdy enough to hold the weight of the mirror and tiles.
Tools and Additional Supplies:
- Pencil or Chalk: For sketching your design on the base.
- Safety Gloves: To protect your hands from sharp mirror edges.
- Spatula or Putty Knife: For applying and spreading grout.
- Damp Cloth: To wipe away excess grout.
- Safety Goggles: To protect your eyes during the crafting process.
Steps:
- Design Inspiration: Before you start, consider looking for mosaic patterns online or in art books for inspiration. Decide on colors, shapes, and the overall feel of the artwork.
- Prep Your Workspace: Ensure your working area is flat, stable, and covered to protect from any glue or grout spills.
- Design Your Pattern: Use a pencil or chalk to lightly sketch your desired pattern on the base. This will serve as a guideline when placing mirror pieces and tiles.
- Adhesive Application: With safety gloves on, apply a generous amount of adhesive to the back of the mirror pieces (and mosaic tiles, if using). Carefully place them on the base, following your sketched design.
- Let it Settle: Allow the adhesive to dry for the duration recommended on its packaging. This ensures that the mirror pieces and tiles won't shift during the grouting process.
- Grouting: Once the adhesive is dry, wear your safety goggles, and spread the grout over the entire piece using a spatula or putty knife, ensuring it fills all gaps between the mirror pieces and tiles.
- Cleanup: Before the grout dries completely, gently wipe away any excess with a damp cloth. This will reveal the brilliance of your mosaic pieces.
- Final Drying: Let the piece dry for an additional 24 hours or as recommended on the grout packaging.
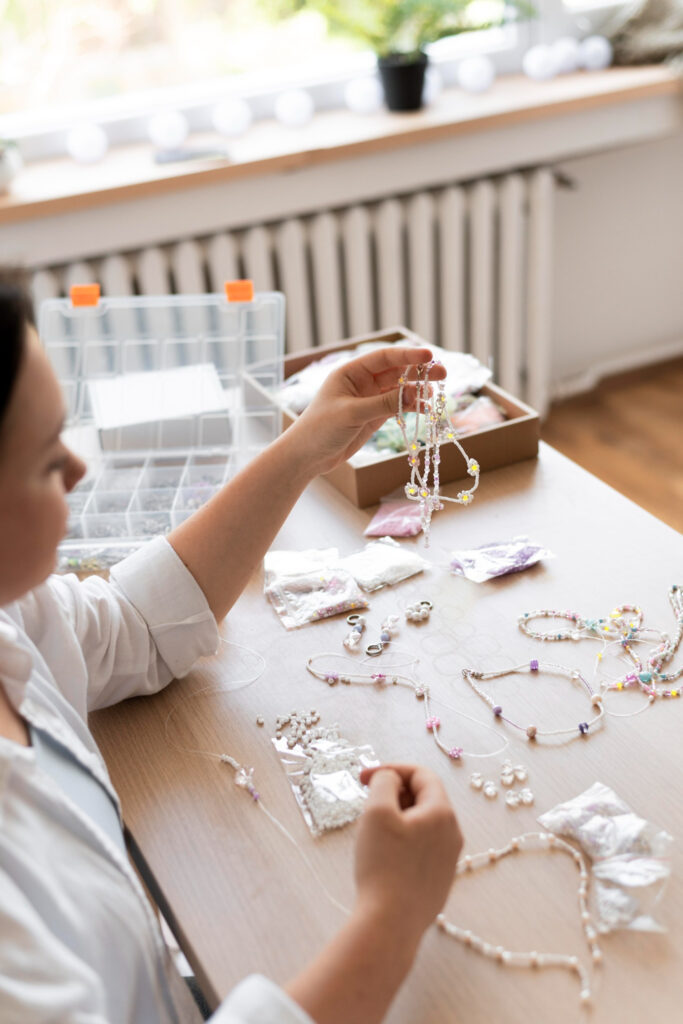
Transforming Broken Mirror into Unique Jewelry
Broken mirrors need not signify bad luck. Instead, turn them into stunning jewelry pieces that shimmer and shine with every move. Creating mirror jewelry not only offers a fashionable accessory but also gives a sustainable touch by repurposing old mirrors. Here's an extended guide to ensure you craft a masterpiece:
Materials Needed:
- Small Mirror Shards: From a broken or old mirror. Always handle with care to avoid cuts. Smooth any sharp edges using a fine grit sandpaper or a glass file.
- Jewelry Settings: Depending on what you want to create, gather settings for pendants, earrings, rings, or even bracelets.
- Strong Jewelry Adhesive: Ensure it's specifically designed for jewelry crafting and can adhere well to glass.
- Jewelry Pliers: For handling and setting the mirror shards with precision.
Additional Supplies:
- Safety Gloves: To protect your hands while working with sharp mirror shards.
- Fine Grit Sandpaper or Glass File: For smoothing out any sharp edges of the mirror pieces.
- Safety Goggles: To protect your eyes from any potential glass splinters.
- Cotton Swabs: For precise application of adhesive and cleanup of any excess.
Steps:
- Design Inspiration: Before you begin, think about the design and style you want for your jewelry. Do you want a minimalist look, or are you going for a more elaborate design? Browse jewelry magazines or websites for ideas.
- Workspace Preparation: Set up a well-lit workspace, preferably with a magnifying glass or lamp if available. Ensure the area is clean and free from dust.
- Selecting Mirror Shards: Wearing safety gloves, carefully select mirror shards that align with the jewelry setting you have. Try out different shards to see which one complements the setting best.
- Smoothen Edges: Using fine grit sandpaper or a glass file, gently smooth out any sharp or rough edges of the selected mirror shard. This ensures the finished jewelry piece is comfortable to wear.
- Adhesive Application: Dip a cotton swab into the jewelry adhesive and apply a thin, even layer to the part of the jewelry setting where the mirror shard will sit.
- Setting the Shard: Using jewelry pliers for precision, place the mirror shard onto the adhesive-covered area of the setting. Press gently to ensure a strong bond.
- Drying Time: Allow the jewelry piece to dry in a safe and undisturbed place. Refer to the adhesive's packaging for recommended drying times, but generally, 24 hours is a safe bet.
DIY Broken Mirror Photo Frames
Celebrate your cherished memories by framing them in a uniquely embellished frame. With pieces of a broken mirror, you can create photo frames that not only safeguard your moments but also add a dash of chic sophistication to your decor. Here's an enriched guide to elevate your crafting experience:
Materials Needed:
- Photo Frame: Choose one of any size or style, but a frame with a wider border will provide more space to arrange the mirror pieces.
- Broken Mirror Pieces: Handle with care. Depending on your design, you might want shards of different shapes and sizes.
- Adhesive Glue: Opt for a strong adhesive that's specifically meant for glass or craft projects to ensure durability.
Additional Supplies and Tools:
- Safety Gloves: To protect your hands from sharp mirror edges.
- Fine Grit Sandpaper or Glass File: To smooth out any sharp edges of the mirror shards, ensuring they're safe to touch once affixed.
- Safety Goggles: To shield your eyes from potential glass splinters.
- Tweezers or Pliers: For precise placement of the mirror shards.
- Damp Cloth or Cotton Swabs: To clean up any excess adhesive or stray fingerprints.
Steps:
- Planning the Design: Before diving in, lay out your mirror shards on a table and experiment with different arrangements. Consider whether you want a dense layout with overlapping pieces or a more minimalist design.
- Prepping the Frame: Clean the frame's surface, ensuring it's free from dust or oils, which could interfere with the adhesive bond.
- Safety First: Wear safety gloves and goggles throughout the process. This is especially crucial when handling or adjusting the broken mirror pieces.
- Smoothing the Shards: Use the fine grit sandpaper or glass file to gently smooth out sharp or rough edges on the mirror shards. This step ensures the finished frame is safe to touch.
- Adhering the Shards: Apply a thin layer of adhesive glue to the back of each mirror shard. Using tweezers or pliers for precision, carefully place the shard onto the desired location on the frame.
- Final Touches: Before the adhesive dries completely, adjust any shards if needed. If any adhesive seeps out from under the shards, wipe it away gently with a damp cloth or cotton swab.
- Drying: Allow the frame to dry in a safe, flat, and undisturbed location. While the exact drying time will depend on the adhesive you've chosen, letting it set for at least 24 hours is generally recommended.
Tabletops and Counters with a Reflective Twist
Breathe new life into an ordinary table or counter by introducing the allure of reflection. Infusing pieces of a broken mirror into its surface not only creates a modern and elegant appearance but also adds depth and dimension to the space. Let's dive deeper into the step-by-step process:
Materials Needed:
- A Plain Table or Counter: Choose an old table or counter that you'd like to revamp, or purchase an inexpensive one for experimentation.
- Broken Mirror Pieces: Gather shards of different shapes and sizes for a varied effect. Remember to handle with care to avoid cuts.
- Adhesive Glue: Opt for a strong adhesive specifically designed for glass to ensure a durable bond.
- Resin or Clear Sealant: This will provide a glossy, smooth finish that protects the mirror pieces and makes the tabletop functional.
Additional Supplies and Tools:
- Safety Gloves: Essential when handling sharp mirror fragments.
- Fine Grit Sandpaper or Glass File: To round off any sharp edges of the mirror shards, ensuring safety and a smoother finish.
- Safety Goggles: To prevent any accidental eye injuries from glass splinters.
- Clean Cloth and Mild Cleaner: For cleaning the table's surface before starting.
- Stir Sticks and Mixing Containers: If you're using a two-part resin.
- Squeegee or Spatula: To evenly spread the resin or sealant.
Steps:
- Preparation: Begin by moving the table or counter to a well-ventilated area, especially if you'll be using strong adhesives and sealants. Protect the floor with newspapers or a drop cloth.
- Table Cleaning: Using a clean cloth and mild cleaner, remove any dust, dirt, or grease from the table's surface to ensure optimal adhesion.
- Safety Measures: Put on your safety gloves and goggles. These will remain essential throughout the project.
- Mirror Shard Refinement: Using sandpaper or a glass file, soften the sharp edges of the mirror pieces. This will make them safer to handle and provide a seamless finish when embedded into the resin or sealant.
- Designing: Lay out your mirror pieces on the table or counter, experimenting with designs until you're satisfied. This could be a random scattering, geometric patterns, or any other design that appeals to you.
- Adhesion: Apply the adhesive to the back of each mirror shard and carefully place them onto the table, sticking to your chosen design. Allow the adhesive to dry based on the manufacturer's recommendation.
- Sealing and Smoothing: Once the adhesive is dry, mix the resin (if using a two-part resin) or prepare your clear sealant. Pour it over the table, ensuring the mirror pieces are fully covered. Use the squeegee or spatula to evenly spread the resin or sealant, removing any bubbles and achieving a level finish.
- Curing: Let the table or counter sit undisturbed for the duration specified by the resin or sealant manufacturer, typically 24-72 hours, to ensure complete curing.

Fairy-tale Inspired Garden Path
Turn the ordinary into the extraordinary by infusing your garden path with a touch of fairy-tale charm. Using reflective mirror shards on garden stones, you can create a shimmering pathway that sparkles in the sunlight and moonlight, reminiscent of the enchanting walkways in fairy tales. Dive into this detailed guide to weave magic into every step.
Materials Needed:
- Garden Path Stones: Depending on your pathway length and design, you'll need a suitable number of stones. Flat, broad stones work best as they provide more surface area for the mirror pieces.
- Broken Mirror Pieces: Handle with care. You can opt for varying sizes to create interesting patterns.
- Outdoor Adhesive: Ensure it's weatherproof and designed for both stone and glass to ensure longevity.
Additional Supplies and Tools:
- Safety Gloves: Essential when handling sharp mirror fragments.
- Fine Grit Sandpaper or Glass File: To smooth any sharp edges of the mirror shards, ensuring they're safe to touch.
- Safety Goggles: To protect your eyes from potential glass splinters.
- Brush and Mild Cleaner: To clean the garden stones.
- Tweezers or Pliers: For precise placement of mirror shards.
- Damp Cloth: To clean up any adhesive spills.
Steps:
- Preparation: Before beginning, decide on the layout of your garden path. Whether you want a straight path, a winding trail, or a branching pattern, having a plan will aid in determining the number of stones and mirror shards you'll need.
- Safety First: Always wear safety gloves and goggles when working with mirror shards to prevent injuries.
- Stone Cleaning: Using a brush and mild cleaner, scrub away any dirt or moss from the garden stones. Rinse them well and let them dry completely.
- Mirror Shard Refinement: With the fine grit sandpaper or glass file, round off the sharp edges of the mirror pieces. This ensures the finished stones are safe to walk on.
- Designing: On a flat surface, arrange your mirror shards on each stone, experimenting with patterns. You could aim for abstract designs, sunbursts, or even mimic constellations.
- Adhesion Process: Apply the outdoor adhesive to the back of each mirror shard. Using tweezers or pliers for better control, place the shard onto its designated spot on the stone. Press down gently to ensure a firm bond.
- Setting: Allow the adhesive to dry for the recommended time on its packaging, ensuring the stones remain undisturbed during this period.
- Installation: Once the adhesive has fully set, lay out your stones in your garden according to your planned pathway design.
Don't throw away those tiny pieces! They can be used to decorate vases, create candle holders, or even as an accent to a decorative bowl.
Tips for Cleaning and Polishing Upcycled Mirror Projects
Upcycling mirrors is a wonderful way to give old mirrors new life and a refreshed appearance. As you invest time and creativity in these projects, it's equally essential to maintain their beauty. Here are some expanded guidelines to ensure your upcycled mirror projects always shine bright:
Regular Dusting
Over time, dust accumulates on mirrors which can dull their shine. Gently dust your mirror using a soft, lint-free cloth to prevent any scratches and maintain its clarity. Consider doing this at least once a week or as often as you notice dust buildup.
Steer Clear of Abrasives
Some household cleaners contain abrasive particles or chemicals that are too harsh for mirrors. Using these can lead to fine scratches or damage the reflective coating of the mirror. Always read the labels of cleaning products before applying them to your mirror projects.
Streak-free Cleaning
For a pristine, streak-free finish, opt for a good quality mild glass cleaner. Apply the cleaner onto a microfiber cloth rather than spraying it directly onto the mirror. This ensures that you use just the right amount and prevents the liquid from seeping into the edges or back of the mirror which can damage it.
Microfiber Magic
Microfiber cloths are excellent for mirror cleaning as they effectively lift dirt and oils without leaving lint or streaks behind. Ensure your cloth is clean before use, and it's a good idea to have a separate cloth dedicated solely for your mirror projects.
Additional Considerations
If your upcycled mirror projects include painted or decorated edges, be cautious around these areas. Some paint or decorations might be sensitive to moisture or certain cleaning agents. If in doubt, test a small, inconspicuous area first.
Conclusion
In conclusion, my accidental encounter with a broken mirror turned into an opportunity to explore creativity, artistry, and resourcefulness. Rather than succumbing to superstition, I embraced the challenge of repurposing those mirror shards into unique and meaningful creations. Through this journey, I discovered a world of possibilities, from crafting mosaic wall art to fashioning jewelry, revitalizing decorate your old piece of furniture, and even enchanting my garden path with a touch of fairy-tale magic.
Through these projects, I learned not only the importance of safety and precision but also the profound joy that comes from breathing new life into old and discarded materials. Each upcycled mirror piece carries a story, a piece of my own personal narrative intertwined with the beauty of art and sustainability.
So, the next time you encounter a broken mirror, remember that it's not just a symbol of bad luck, but a chance to transform adversity into something beautiful and meaningful. With a dash of creativity, a sprinkle of inspiration, and a commitment to safety, you can turn misfortune into artistic masterpieces that reflect your unique style and ingenuity. Embrace the magic of upcycling, and may your broken mirrors become the mirrors that reveal your creativity and resilience.
Sources
https://www.ncbi.nlm.nih.gov/pmc/articles/PMC3330535/
https://sc.edu/uofsc/posts/2021/06/06_conversation_broken_mirror.php