DIY Diamond Painting
Diamond painting has truly captured my artistic spirit, offering a delightful and soothing craft hobby that resonates with people of all ages. If you're seeking to craft a mesmerizing work of art using shimmering gems, you've found your creative haven.
In this all-encompassing guide, we'll embark on a journey through the world of DIY diamond painting, uncovering its fundamentals and venturing into more advanced techniques.
Whether you're just starting out or a seasoned enthusiast like me, these invaluable insights and insider tips will empower you to fashion an enchanting masterpiece that graces your home with its radiant beauty.
What is Diamond Painting?
Diamond painting is a captivating and creative craft hobby that has gained popularity in recent years. It blends the techniques of traditional paint-by-numbers and cross-stitches with a unique twist—the incorporation of dazzling, small, faceted gems.
This artistic process entails meticulously placing colorful resin diamonds onto an adhesive canvas, resulting in a visually striking masterpiece that not only showcases a rich spectrum of colors but also offers a delightful textured effect
Whether you're a seasoned artist or a novice looking for a creative outlet, diamond painting provides an engaging and rewarding way to craft beautiful and intricate artworks that shine with brilliance.
Why Choose Diamond Painting?
Choosing to engage in the art of diamond painting is a decision that's driven by a multitude of compelling factors, which have contributed to its widespread popularity:
- Stress Reduction: Diamond painting offers a tranquil and meditative experience. The repetitive, precise motions of placing gems onto the canvas can be incredibly calming, making it an ideal way to unwind and alleviate stress and anxiety in today's fast-paced world.
- Creative Outlet: This craft provides an avenue for artistic expression regardless of your skill level. Even if you've never considered yourself an artist, diamond painting enables you to create stunning, intricate designs effortlessly. It's a creative pursuit that welcomes both beginners and seasoned artists alike.
- Home Décor and Gifting: The finished diamond paintings serve as more than just a personal achievement. They can be proudly displayed as striking home decor pieces, adding a touch of elegance and individuality to your living space. Additionally, completed works make heartfelt and personalized gifts that are sure to be cherished by recipients.
- Diverse Selection: The world of diamond painting offers a vast array of options. You can choose from a wide variety of kits, ranging from straightforward and simple designs suitable for beginners to highly intricate and detailed masterpieces that challenge the most experienced artists. This diversity ensures that there's something to pique the interest of every enthusiast, ensuring a constantly evolving and engaging experience.
Getting Started
Essential Supplies
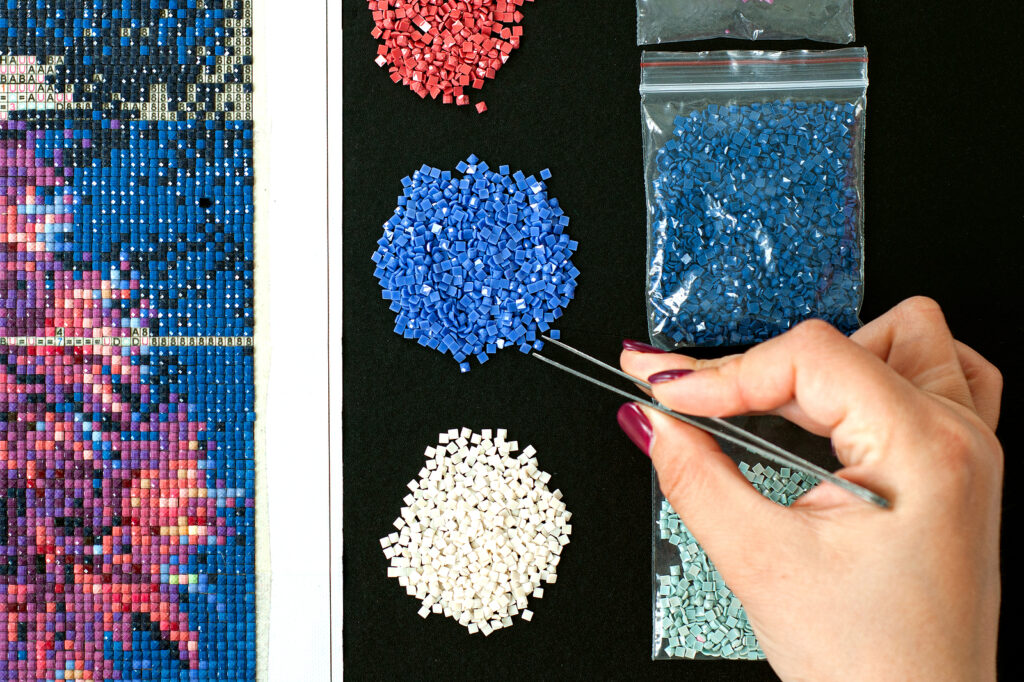
- Diamond Painting Kit: Start by acquiring a diamond painting kit. These kits typically contain everything you need, including a canvas with adhesive, an assortment of diamonds, a stylus pen, a wax pad, and a tray for organizing and applying the diamonds.
- Comfortable Workspace: Choose a workspace that offers both comfort and functionality. It's crucial to select a well-lit area with ample natural light or a bright LED lamp to minimize eye strain during the intricate process.
- Storage Containers: Invest in small containers or organizers to sort and store your diamonds. Keeping them organized will make your project more efficient and enjoyable.
- Frame (Optional): If your intention is to display your finished masterpiece, consider purchasing a frame in advance that complements the canvas's size and design.
Choosing the Right Canvas
Selecting the appropriate canvas sets the foundation for a satisfying diamond painting experience. Take these factors into account:
- Size: Carefully consider the canvas size based on your skill level and the time you can commit to the project. Larger canvases can be more intricate and time-consuming, while smaller ones are better for beginners or those with limited time.
- Design: Choose a design that resonates with your personal preferences. Options abound, ranging from landscapes, animals, abstract art, to even custom designs based on your favorite photos. Select one that truly inspires you.
- Quality: Prioritize quality when selecting your canvas. Reading reviews and seeking recommendations can help you find a canvas with clear symbols and strong adhesive, ensuring that your diamonds stay in place throughout the process.
Preparing Your Workspace
Create an environment conducive to your diamond painting journey:
- Lighting: Ensure your workspace is well-lit. Good lighting is essential for accurately placing the tiny diamonds and prevents eye strain. Natural light or a bright LED lamp is highly recommended.
- Table or Easel: Choose a flat, sturdy surface for your workspace. Some artists prefer to work on an easel, which allows for a more angled approach. Experiment to find what works best for you.
- Comfort: Invest in a comfortable chair that provides adequate support for extended periods of work. Consider using a cushion or pillow to support your wrists and enhance your comfort during the intricate process. Your physical comfort greatly influences the quality of your work.
The Diamond Painting Process
Applying Adhesive to the Canvas
- Prepare Your Workspace: Lay out your canvas on a clean, flat surface, ensuring that it remains free from dust or debris that could interfere with the adhesive.
- Starting Point: Commence at the top of the canvas and gently peel back a small section of the protective plastic covering, exposing the sticky adhesive beneath.
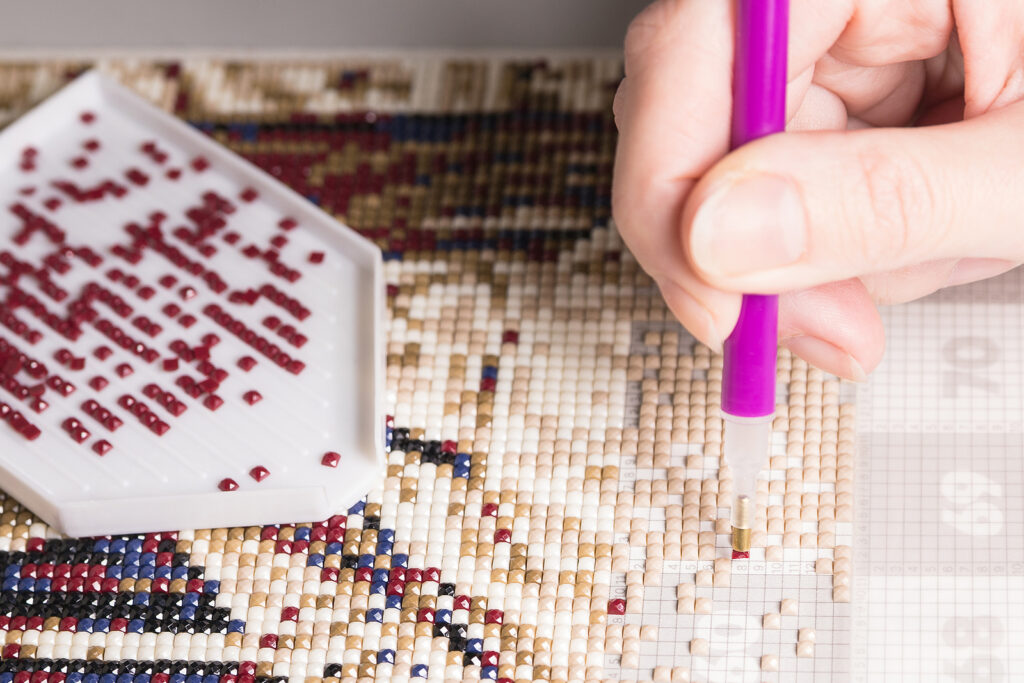
- Diamond Pickup: Employ the wax pad attached to the stylus pen to pick up a single diamond. The wax pad helps the diamond adhere to the pen's tip for easy handling.
- Precise Placement: With utmost care and precision, place the diamond onto the corresponding symbol on the canvas. This step is the heart of the process, where each diamond finds its designated spot.
- Continual Progress: Continue this meticulous process, section by section, until the entire canvas is covered with diamonds. Patience and attention to detail are key to achieving a flawless outcome.
Placing Diamonds on the Canvas
Properly placing the diamonds is paramount to achieving a visually stunning result:
- Alignment: Ensure that each diamond is aligned neatly with its corresponding symbol on the canvas. Accuracy in placement is essential for the overall visual appeal of your artwork.
- No Gaps: Avoid leaving gaps between the diamonds; they should snugly fit together, creating a seamless and cohesive look. Any gaps can disrupt the design's integrity.
- Consistency: Maintain a consistent level of pressure when placing diamonds. This consistency ensures that all diamonds are firmly adhered to the adhesive and sit at the same height on the canvas, contributing to a uniform and polished appearance.
Using Tools for Precision
Diamond painting kits come equipped with several tools to facilitate precision and efficiency:
- Stylus Pen: The stylus pen serves as your primary tool for picking up and placing diamonds on the canvas. It provides a controlled and gentle touch, helping you accurately position each diamond.
- Wax Pad: The wax pad, typically located at the end of the stylus pen, plays a crucial role in ensuring that the diamonds adhere securely to the pen's tip. This feature simplifies the diamond pickup process.
- Tray: The tray serves as a convenient container for holding and organizing the diamonds as you work. It helps keep the colors separated and accessible, streamlining your workflow and reducing the chances of misplacement.
Tips for Beginners
Start with a Small Project
If you're new to diamond painting, it's wise to begin with a smaller, less complex design. This allows you to get the hang of the technique and build your confidence.
Organize Your Diamonds
Keep your diamonds well-organized using small containers, labeled bags, or a multi-grid storage box. This prevents mix-ups and speeds up the process.
Work in Good Lighting
Working in good lighting conditions is essential to avoid eye strain and ensure accurate placement of diamonds. Natural light or a bright LED lamp is ideal.
Use a Comfortable Work Surface
Select a comfortable and flat work surface to lay your canvas on. This provides stability and minimizes the risk of wrinkles or creases in the canvas, ensuring your diamonds adhere properly.
Start with a Basic Kit
When choosing your initial diamond painting kit, opt for one that includes all the essential tools. This typically includes a canvas, diamonds, a diamond applicator pen, wax, and a tray. Starting with a comprehensive kit simplifies the process and ensures you have everything you need to begin your project.
Master the Diamond Applicator Pen
Practice using the diamond applicator pen to pick up and place the gems accurately. It might take a little time to get the hang of it, but with practice, you'll become more proficient in handling the tiny diamonds.
Frequent Breaks
Diamond painting can be addictive, but it's essential to take regular breaks. This helps prevent hand fatigue and maintains your focus and precision throughout the project.
Advanced Techniques
Once you've mastered the basics, you can explore advanced techniques to enhance your diamond painting skills:
Multicolored Diamonds
Some designs feature diamonds of different colors within the same section. Pay close attention to the color codes and use a multi-placer tool for efficient placement.
Special Diamond Shapes
Experiment with special-shaped diamonds, such as hearts or stars, to add extra flair to your artwork. These diamonds can make your piece more unique and eye-catching.
Creating Shading and Depth
For advanced diamond painters, creating shading and depth in your artwork is a rewarding challenge. This involves using various shades of diamonds to create a three-dimensional effect.
Blending Colors
Once you're comfortable with basic diamond painting, you can delve into the world of color blending. This technique involves combining different diamond colors in a single section to achieve subtle gradients or transitional shades. Blending adds an exquisite level of sophistication to your artwork, enabling you to create realistic portrayals of landscapes, portraits, or intricate patterns.
Custom Designs
As you gain confidence in your diamond painting abilities, consider creating custom designs. This involves sourcing or designing your own patterns rather than relying on pre-made kits. With custom diamond painting, you have the freedom to express your unique artistic vision, turning your favorite photos, artwork, or concepts into stunning diamond-studded creations.
Advanced Backgrounds
Elevate your diamond painting by paying special attention to the background. Experiment with different background materials, textures, or even mixed-media elements to make your artwork truly one-of-a-kind. By using complementary colors, gradients, or adding additional elements like glitter or metallic accents to the background, you can create striking contrasts and visual interest in your pieces.
Mosaic Effects
For a mesmerizing and intricate look, explore the mosaic technique. This involves placing tiny diamonds in a more randomized or irregular fashion, akin to creating a mosaic pattern. Mosaic-style diamond painting can result in stunning, visually complex designs that resemble intricate stained glass or mosaic art.
Finishing and Framing
Sealing Your Diamond Painting:
Once you've painstakingly placed every diamond and completed your masterpiece, it's imperative to take steps to protect your artwork and ensure the longevity of those glittering gems. Sealing your diamond painting is a crucial final touch.
To accomplish this, you have a couple of options. One popular method is to use a specialized sealant designed for diamond paintings. These sealants are typically clear and provide a protective layer that not only helps keep the diamonds securely in place but also safeguards the canvas from dust, moisture, and potential damage. Apply the sealant evenly across the entire canvas, ensuring that each diamond is adequately covered. Allow it to dry completely before moving on to the framing step.
Another option is to use a clear adhesive sheet, often referred to as a “diamond painting cover film.” This transparent sheet is applied over the finished painting, similar to a laminating process. It not only provides protection but also enhances the overall appearance by creating a glossy finish. Carefully align and apply the adhesive sheet, smoothing out any air bubbles or wrinkles for a pristine result.
Framing Your Finished Piece:
To truly showcase your completed diamond painting and give it a polished, professional look, consider framing it. Framing not only adds an elegant touch but also protects the sealed artwork from dust, fingerprints, and potential damage.
When framing your diamond painting, you have several options. Many craft stores offer custom framing services where you can select a frame style and matting to perfectly complement your artwork. This option ensures a tailored and precise fit for your piece.
Alternatively, you can purchase a standard frame that matches the dimensions of your canvas. Ensure that the frame is deep enough to accommodate the thickness of the sealed canvas. To add a finishing touch, you might choose a frame with a decorative border or one that complements the colors in your diamond painting.
Caring for Your Diamond Painting
Cleaning and Maintenance:
To ensure your diamond painting retains its brilliance and remains in pristine condition, it's essential to follow these careful care and maintenance guidelines:
- Regular Dusting: Dust can accumulate on the surface of your diamond painting over time, dulling its sparkle. Use a soft, lint-free cloth or a gentle duster to regularly remove dust and debris from the canvas. Gently pat or swipe the cloth across the diamonds to avoid dislodging them.
- Avoid Heavy Objects: To prevent any damage or warping to your artwork, refrain from placing heavy objects on top of it. Even though the diamonds are secured, applying pressure can disrupt the adhesive and distort the canvas.
- Protect from Sunlight: Prolonged exposure to direct sunlight can fade the colors of your diamond painting. It's advisable to display your finished piece in an area that receives indirect or filtered natural light or use UV-protective glass if framing it.
- Control Humidity: Extremes in humidity can impact the adhesive on your diamond painting. Avoid storing or displaying it in overly humid or damp conditions to prevent the canvas from losing its stickiness or the diamonds from becoming affected.
Proper Storage:
When life demands that you temporarily set aside your unfinished diamond painting, proper storage is crucial to safeguard your progress and materials:
- Rolling and Wrapping: Roll up your unfinished diamond painting gently, with the diamond side facing outward. Use a large-diameter cardboard tube to prevent creases or damage to the canvas. Alternatively, you can wrap it in a layer of plastic wrap or a plastic bag to further protect it from dust and moisture.
- Labeling: To ensure you can easily resume your project later, label or document the color codes and progress on a separate sheet. This will help you pick up where you left off without confusion.
- Storage Container: Consider investing in a purpose-built storage container for your diamond painting supplies. These containers often feature compartments for organizing your diamonds, pens, and other tools, keeping everything neatly in one place.
- Cool, Dry Place: Store your unfinished diamond painting in a cool, dry place. Avoid areas with extreme temperature fluctuations or high humidity levels, as these conditions can affect the adhesive and the quality of your diamonds.
Conclusion
As a homeowner and passionate enthusiast of diamond painting, this craft has become my sanctuary, offering a blend of creativity and tranquility that elevates both my living space and my inner world. It's not just about adorning my home with sparkling masterpieces but about finding solace in the meticulous placement of each radiant gem.
Diamond painting's therapeutic qualities provide an escape from the chaos of daily life, inviting all, from beginners to seasoned artists, into a world of diverse designs and techniques.
This art form is a journey of personal growth, allowing me to start small and build confidence, eventually exploring advanced techniques like multicolored diamonds, intricate shading, and custom designs that reflect my unique artistic vision.
Beyond the creative joy, diamond painting brings the fulfillment of gifting and the pride of home decor, infusing my space with individuality and radiance. Whether you're just starting or deeply immersed, let diamond painting continue to inspire and delight, enriching your life with both artistic expression and a sense of accomplishment, just as it has for me as a homeowner and devoted enthusiast.
Happy diamond painting!
Studies Sources
https://www.nga.gov/content/dam/ngaweb/research/publications/pdfs/mondrian-diamond-compositions.pdf