How to DIY Clean Air Ducts
Indoor air quality is a critical aspect of maintaining a healthy and comfortable living environment. One often underestimated factor in indoor air quality is the cleanliness of your air ducts. Over time, air ducts can accumulate a myriad of contaminants, including dust, debris, mold, and allergens.
These pollutants can adversely affect the air you breathe and the overall efficiency of your HVAC system. In this extensive guide, we will delve deep into the process of DIY air duct cleaning, offering you in-depth knowledge and detailed instructions to improve your indoor air quality and ensure the optimal functioning of your HVAC system.
Understanding the Importance of Clean Air Ducts
Before delving into the intricacies of DIY air duct cleaning, it is vital to comprehend why clean air ducts are essential for your home's well-being. Your HVAC system plays a pivotal role in maintaining indoor air quality. As air is circulated throughout your home, it passes through the ductwork, where contaminants can accumulate over time. Neglecting regular cleaning can lead to various issues, including:
Reduced Indoor Air Quality
Accumulated dust, allergens, and contaminants in your air ducts can significantly decrease the quality of the air you breathe indoors. These particles are reintroduced into your living spaces, potentially causing respiratory problems and allergies.
Aggravated Allergies and Respiratory Issues
If you or your family members suffer from allergies or respiratory conditions, dirty air ducts can exacerbate these problems. The presence of allergens and pollutants in the air can lead to more frequent and severe symptoms.
Decreased Efficiency of Your HVAC System
When your air ducts are clogged with debris, your HVAC system has to work harder to maintain the desired temperature, leading to reduced efficiency. This inefficiency can result in higher energy bills and a shorter lifespan for your HVAC equipment.
Increased Energy Bills
As your HVAC system struggles to function efficiently due to dirty air ducts, it consumes more energy, which reflects in higher utility bills. Cleaning your air ducts can help you save on energy costs in the long run.
Unpleasant Odors
Accumulated dust, mold, and other contaminants can emit unpleasant odors when your HVAC system is in operation. These odors can permeate your home, making it less pleasant to live in.
Read also our post on Carpet Cleaning DIY vs Professional
Protecting Yourself and Your Home
Safety should always be the top priority when embarking on a DIY project like air duct cleaning. Taking the necessary precautions will ensure a safe and successful cleaning process. Here are detailed safety measures to follow:
Turn off the HVAC System
Before you start any cleaning activities, make sure to switch off your heating and cooling system to prevent any accidental activation during the cleaning process. This ensures your safety and the safety of the HVAC system.
Wear Protective Gear
To shield yourself from dust, debris, and potential allergens, it is imperative to wear appropriate protective gear, which includes:
- Safety goggles: Protect your eyes from dust and debris.
- Dust mask: Prevent inhaling harmful particles.
- Gloves: Keep your hands safe from contaminants.
- Long-sleeved clothing: Cover your arms to minimize exposure.
Cover Furniture and Flooring
Safeguard your furniture and flooring from dust and debris by placing drop cloths or plastic sheeting over them. This will prevent any unwanted damage or mess during the cleaning process.
Test for Asbestos
If your home was constructed before 1980, it's crucial to check for the presence of asbestos in your ductwork. Asbestos was used in some insulation materials, and disturbing it can be hazardous to your health. If you suspect asbestos, consult a professional for testing and removal.
Open Windows for Ventilation
Ensure proper ventilation by opening windows in the area where you are working. This will help in dissipating dust and maintaining a fresh air supply.
Step-by-Step Guide to DIY Air Duct Cleaning
Inspecting Your Air Ducts: The Initial Assessment
Before diving into the actual cleaning process, it's essential to conduct a thorough inspection of your air ducts. This initial assessment will help you identify any issues or areas that require specific attention. Here's how to go about it:
- Visual Inspection: Start by visually inspecting your air ducts. Look for signs of dust buildup, debris, mold, or any visible damage. Pay close attention to bends and corners where contaminants often accumulate.
- Use a Flashlight: In areas with limited visibility, use a flashlight to get a better look inside the ducts. Shine the light at different angles to detect hidden contaminants.
- Check for Mold: Mold growth is a common issue in air ducts. If you notice any mold or mildew, it's crucial to address it promptly. Mold can have adverse health effects, so ensure proper remediation if needed.
- Assess Ductwork Condition: Inspect the condition of your ductwork. Look for any visible leaks, loose connections, or damaged insulation. Identifying these issues early can prevent further damage to your HVAC system.
- Take Before Photos: It's a good practice to take photographs before starting the cleaning process. These photos can serve as a reference point and help you track the progress of your cleaning efforts.
By conducting a thorough inspection, you'll have a clear understanding of the state of your air ducts and can proceed with the cleaning process more effectively.
Preparing Your Home: Setting the Stage for Cleaning Success
To ensure a smooth and successful DIY air duct cleaning experience, proper preparation is key. Here are the steps to prepare your home for the task ahead:
- Turn Off the HVAC System: Before you begin any cleaning activities, ensure that your heating and cooling system is turned off. This prevents air circulation during the cleaning process, reducing the risk of dust and contaminants being spread throughout your home.
- Remove Registers and Grilles: Using a screwdriver, carefully remove the registers and grilles from your duct openings. Set them aside for cleaning later.
- Cover Supply Registers: To prevent dust and debris from being pushed into your rooms during the cleaning process, cover the supply registers with plastic bags or use cardboard. Secure them in place with tape.
- Lay Drop Cloths or Plastic Sheeting: Protect your furniture and flooring by laying down drop cloths or plastic sheeting in the areas where you'll be working. This will help contain any dust or debris and make cleanup easier.
By taking these preparatory steps, you create a controlled environment that minimizes the impact of dust and contaminants on your home, ensuring a more efficient and less messy cleaning process.
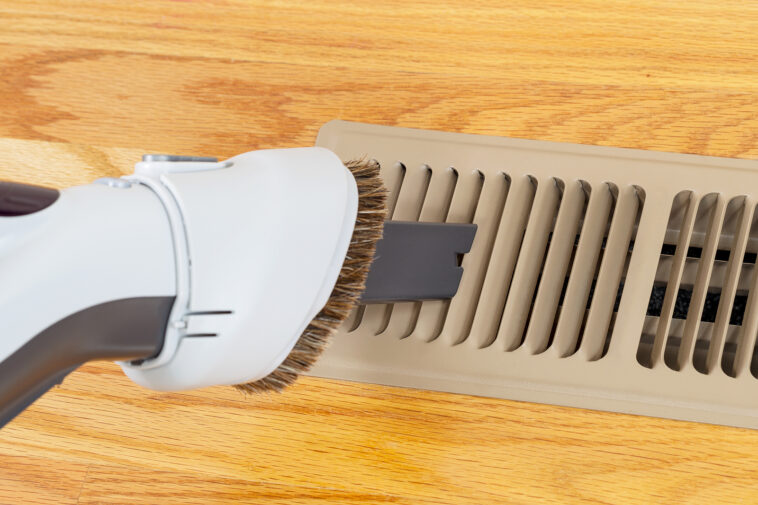
Cleaning the Supply Ducts: Eliminating Contaminants from the Source
Cleaning the supply ducts is a crucial step in ensuring that the air circulated into your living spaces is free from contaminants. Here's a detailed breakdown of how to clean the supply ducts:
- Attach the Brush Attachment to Your Duct Cleaning Rod: To begin cleaning the supply ducts, attach the brush attachment to your duct cleaning rod. The brush attachment should be selected based on the size of your ducts and should have soft bristles to prevent damage.
- Insert the Rod and Brush: Carefully insert the rod and brush attachment into the supply duct as far as you can reach. Start from one end and work your way systematically through the duct. Rotate the brush as you go to dislodge dust and debris from the inner surfaces.
- Use the Vacuum Cleaner: As you brush the inner surfaces of the supply duct, simultaneously use your vacuum cleaner with an extension hose to suction up the loosened debris. The vacuum cleaner's HEPA filter will ensure that the contaminants are effectively captured and not released back into your home.
- Systematic Cleaning: Be thorough and systematic in your approach. Ensure that you cover the entire length of each supply duct, paying particular attention to corners, bends, and junctions where dust tends to accumulate.
- Repeat the Process: Repeat the cleaning process for all supply ducts in your home. Be patient and take your time to ensure that each duct is adequately cleaned.
Cleaning the supply ducts is a vital step in improving the quality of air that is distributed throughout your home. By removing contaminants at the source, you ensure that the air you breathe is cleaner and healthier.
Cleaning the Return Ducts: Ensuring Proper Circulation
Cleaning the return ducts is equally important as it ensures that air circulation within your HVAC system remains unobstructed and efficient. Here's a detailed guide on how to clean the return ducts:
- Repeat the Brush Attachment Setup: Just as you did for the supply ducts, repeat the process of attaching the brush to your duct cleaning rod, ensuring that you have the appropriate size and soft bristles.
- Insert the Rod and Brush into Return Ducts: Carefully insert the rod and brush attachment into the return ducts. Begin with the furthest return duct from your HVAC system and work your way back. This ensures that contaminants are pushed towards the central unit for easier collection.
- Rotate the Brush and Brush Thoroughly: As you insert the brush, rotate it to dislodge dust and debris from the inner surfaces of the return ducts. Ensure that you cover the entire length of each duct and reach corners and junctions.
- Use the Vacuum Cleaner for Suction: Simultaneously, use your vacuum cleaner with an extension hose to suction up the loosened debris. The vacuum's HEPA filter will capture the contaminants effectively.
- Repeat for All Return Ducts: Repeat the cleaning process for all the return ducts in your home. It's essential to be systematic and thorough to ensure that all return ducts are cleaned.
Cleaning the return ducts helps maintain proper airflow within your HVAC system and prevents the recirculation of contaminants into your living spaces. This step is critical for both the efficiency of your system and your indoor air quality.
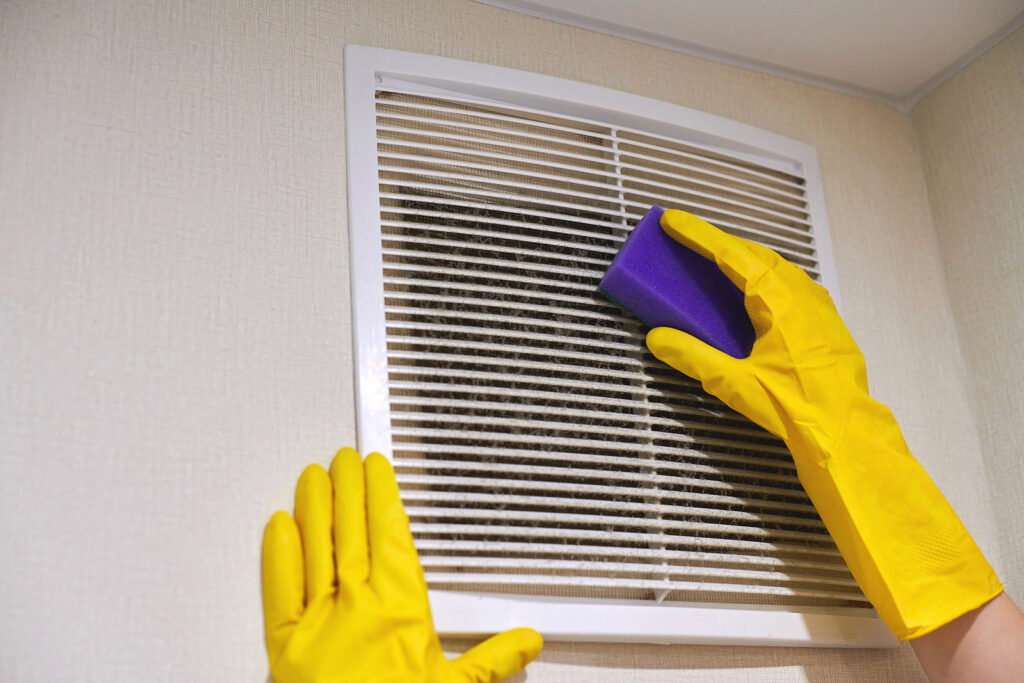
Cleaning the Registers and Grilles: Enhancing Aesthetic and Functional Aspects
Registers and grilles not only play a functional role in your HVAC system but also contribute to the aesthetics of your home. Cleaning them is an essential part of the process. Here's how to do it effectively:
- Remove Registers and Grilles: Retrieve the registers and grilles you removed earlier and prepare them for cleaning. These components are typically attached with screws, so use your screwdriver to detach them.
- Wash with Warm, Soapy Water: Fill a basin or bucket with warm, soapy water. Submerge the registers and grilles and use a microfiber cloth to scrub away dust, dirt, and any built-up grime. Pay special attention to crevices and corners.
- Rinse and Dry Thoroughly: After scrubbing, rinse the registers and grilles thoroughly to remove all soap residue. Allow them to air dry completely before reinstallation.
- Inspect for Any Damage or Wear: While cleaning the registers and grilles, take the opportunity to inspect them for any signs of damage, wear, or corrosion. If you notice any issues, consider replacing them to ensure optimal functionality and aesthetics.
- Reattach Registers and Grilles: Once the registers and grilles are completely dry, use your screwdriver to reattach them securely to their respective openings. Ensure that they fit snugly and are aligned properly.
Cleaning registers and grilles not only enhances the overall appearance of your HVAC system but also ensures that air can flow freely, optimizing the performance of your heating and cooling system.
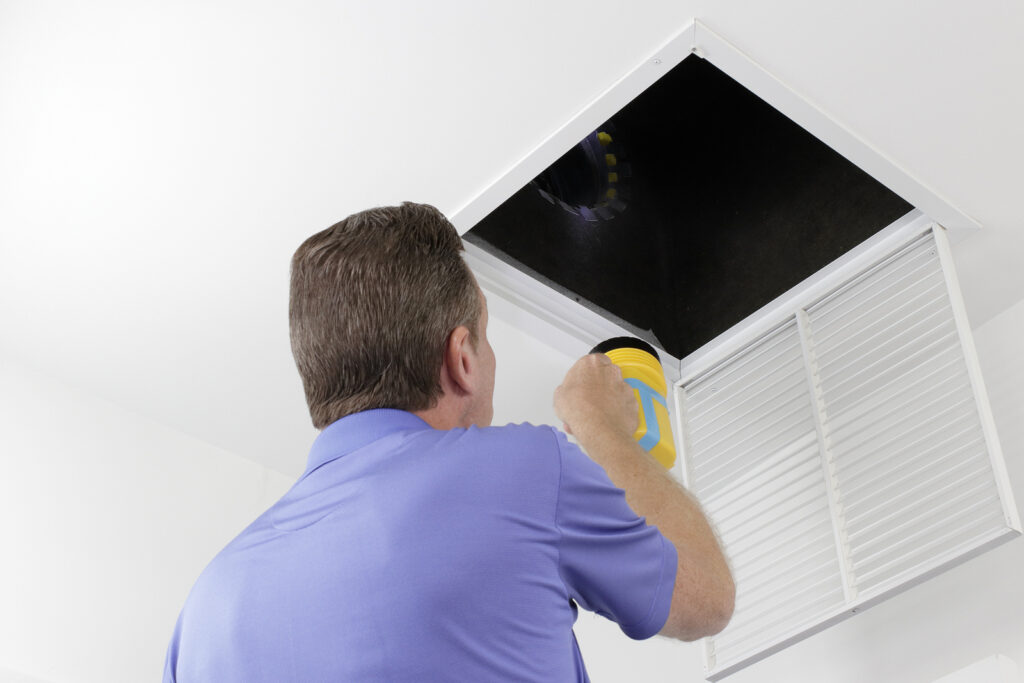
Cleaning the Blower Compartment: Enhancing HVAC System Performance
The blower compartment is a critical component of your HVAC system responsible for moving air through the ducts. Cleaning this area is essential for maintaining system efficiency. Here's how to clean the blower compartment:
- Turn Off the Power: Before accessing the blower compartment, turn off the power to your HVAC system. This ensures your safety during the cleaning process.
- Remove the Access Panel: The blower compartment is typically located behind an access panel. Use your screwdriver to remove the access panel carefully.
- Inspect the Blower Fan: Once the access panel is removed, you'll have access to the blower fan. Use your flashlight to inspect it for dust and debris. If there's a significant buildup, it's time for cleaning.
- Use Your Vacuum Cleaner: With the brush attachment still attached, use your vacuum cleaner to gently remove dust and debris from the blower fan, motor, and any accessible components. Be careful not to damage any wires or other parts during this process.
- Clean the Blower Compartment: While cleaning the blower fan, take the opportunity to clean the entire blower compartment. Dust and debris can accumulate on surfaces and affect performance.
- Reattach the Access Panel: After cleaning, securely reattach the access panel to the blower compartment. Ensure that it is fastened properly to prevent any safety hazards.
By cleaning the blower compartment, you ensure that your HVAC system operates at peak efficiency, reducing energy consumption and extending the lifespan of the equipment.
Reassembling and Testing: Putting It All Back Together
After completing all the cleaning steps, it's time to reassemble the components and test your HVAC system to ensure that everything is in proper working order. Here's how to do it:
- Reattach Registers and Grilles: Using your screwdriver, reattach the registers and grilles to their respective openings. Ensure that they are secured tightly and aligned correctly.
- Turn On the HVAC System: Turn on the power to your HVAC system to activate the heating or cooling mode. Allow the system to run for a few minutes to ensure proper airflow and performance.
- Check for Unusual Noises or Issues: While the system is running, listen for any unusual noises or performance issues. These could indicate underlying problems that may require professional attention.
- Monitor Air Quality: Over the next few days, pay attention to the indoor air quality in your home. You should notice an improvement in the freshness and cleanliness of the air.
- Replace HVAC Filter: Consider replacing your HVAC filter with a clean one to maximize air quality and system efficiency. Regular filter replacement is crucial for maintaining clean air ducts.
Reassembling and testing your HVAC system is the final step in the DIY air duct cleaning process. It ensures that your system is functioning optimally and that the air circulating in your home is clean and fresh.
Read also our post on Cleaning Hacks Save Money
Maintaining Clean Air Ducts: Keeping the Freshness Alive
Maintaining clean air ducts is essential to enjoy the benefits of improved indoor air quality and an efficiently functioning HVAC system. Here are some maintenance tips to help you keep your air ducts clean:
Change Your HVAC Filter Regularly
One of the simplest yet most effective ways to maintain clean air ducts is by regularly changing your HVAC filter. A clean filter traps dust and contaminants, preventing them from entering your ducts. Check your filter every one to three months, depending on usage, and replace it as needed.
Keep Your Home Clean
Maintaining a clean living environment reduces the introduction of dust and debris into your ducts. Regularly dust and vacuum your home, and consider using a HEPA filter in your vacuum cleaner to capture even the smallest particles.
Schedule Professional Duct Cleaning
While DIY cleaning is effective, it's still advisable to schedule professional duct cleaning every 3-5 years or as needed. Professionals have specialized equipment and expertise to perform a thorough cleaning and address any issues you may have missed.
Benefits of DIY Air Duct Cleaning
Engaging in DIY air duct cleaning offers a multitude of benefits that not only improve your indoor environment but also contribute to cost savings and energy efficiency. Here's a more in-depth look at the rewards of your efforts:
Improved Indoor Air Quality
Cleaning your air ducts removes dust, allergens, and contaminants that can compromise indoor air quality. You and your family will breathe cleaner, fresher air, reducing the risk of allergies and respiratory issues.
Increased HVAC System Efficiency
A clean HVAC system operates more efficiently. When ducts are free from debris, air can flow freely, reducing the workload on your heating and cooling equipment. This leads to lower energy consumption and decreased utility bills.
Lower Energy Bills
As your HVAC system runs more efficiently, you'll notice a decrease in your energy bills. Clean air ducts contribute to optimal airflow, reducing the amount of energy needed to heat or cool your home.
Extended System Lifespan
A well-maintained HVAC system typically has a longer lifespan. By cleaning your air ducts, you reduce the wear and tear on your system, ultimately saving you money on costly replacements or repairs.
Reduced Allergen Exposure
For individuals with allergies or respiratory conditions, clean air ducts mean reduced exposure to allergens and irritants. You'll experience fewer allergy symptoms and enjoy a more comfortable living environment.
Elimination of Unpleasant Odors
Dust and contaminants in your ducts can lead to unpleasant odors when your HVAC system is in operation. Cleaning your ducts helps eliminate these odors, leaving your home smelling fresh.
Conclusion: Breathe Easy with Clean Air Ducts
In conclusion, clean air ducts are essential for maintaining a healthy indoor environment and ensuring the efficient operation of your HVAC system. By following the comprehensive guide provided in this article, you have gained valuable insights into the importance of clean air ducts, safety precautions, necessary tools and materials, and the step-by-step process of DIY air duct cleaning.
Regular air duct maintenance and cleaning offer a multitude of benefits, including improved indoor air quality, increased HVAC system efficiency, lower energy bills, extended system lifespan, reduced allergen exposure, and the elimination of unpleasant odors. By taking the time to clean your air ducts and adopting proper maintenance practices, you can enjoy a cleaner, healthier, and more comfortable living space for you and your family.
Remember to follow safety precautions, use the right tools, and seek professional assistance when necessary. Clean air ducts are the foundation of better indoor living, and your efforts will be rewarded with a fresher and more pleasant environment for years to come.
Sources
https://www.steamyconcepts.com/blog/2023/06/28/air-duct-cleaning-the-diy-approach/
https://www.ontimehomeservices.com/blog/2018/september/diy-air-duct-cleaning/